
ACE-Step 1.5 is an open model that creates complete songs with lyrics and vocals on your own computer, without the cloud, subscription, or limits. You enter a style description and words, click "Generate Music," and after a few seconds, you have an MP3 file. This guide takes you from scratch: what it is and what it can do, what computer is needed, how to install on Mac, Windows, and Linux, what the fields in the interface mean (with screenshots from a working installation), how to make your first song, how to write descriptions and lyrics to get good results, and what comes next: remixing, repainting a segment, creating your own style through LoRA. Everything in Polish, in simple words.
Last verified: September 7, 2026. Informational material. ACE-Step is rapidly evolving: field names, models, and requirements change from version to version; screenshots are from the version downloaded from the repository on August 29, 2026, running on a Mac with Apple Silicon. Current documentation: github.com/ace-step/ACE-Step-1.5.
In brief
- ACE-Step 1.5 is a free, open model for creating music under the MIT license, developed by ACE Studio and StepFun. It creates songs from 10 seconds to 10 minutes, with vocals in over 50 languages, including Polish, as well as instrumental tracks (documentation).
- It works locally: on NVIDIA cards with around 4 GB of memory (no planner mode) and 6 GB (full), on Macs with Apple Silicon via MLX, on AMD and Intel. Models take about 10 GB on disk (installation instructions).
- Installation is three commands (uv manager, downloading the repository, running) or a ready package for Mac and Windows. The interface opens in a browser at 127.0.0.1:7860.
- Two modes to start: Simple (you write one sentence, the model composes the description, text, and parameters itself) and Custom (you write a style description and text with tags [Verse], [Chorus]). The most important field is the style description; the second is the text with tags.
- On a Mac with Apple Silicon, a 30-second song is created in about half a minute; on a powerful NVIDIA card, a whole song in a few seconds. The model generates several versions at once and can evaluate them itself.
- The songs are yours to listen to and experiment with; when publishing, check originality, disclose AI involvement, and do not copy the style of specific artists without permission. This is recommended by the project itself.
What is ACE-Step, in simple words
ACE-Step is a program that turns a verbal description into a music recording. You write what style you want ("warm folk with acoustic guitar and piano, nostalgically, slowly"), add the song lyrics with indications for verses and choruses, and the model creates a finished track: arrangement, instruments, vocals singing your text. It is equivalent to commercial services like Suno or Udio, with the difference that it runs on your computer, is free, and does not send anything to the cloud.
Inside, two "brains" are working, and it is worth understanding this, as it explains the fields in the interface (project tutorial):
A small language model that reads your description and text, invents missing elements (tempo, key, length, and in Simple mode also the entire text) and outlines a "sketch" of the song. In the interface, this is the "5Hz LM" and the "Think" switch.
A diffusion model that creates sound from the sketch and description. The "turbo" version does this in 8 steps and is recommended for everyday use; "base" and "sft" in 50 steps, more accurately and slowly.
The planner is the producer who turns your idea into a recording plan; the performer is the band in the studio. The style description tells both what you want; the text with tags tells what should happen in the following seconds.
What it can do
| Function | What it does | Mode in the interface |
|---|---|---|
| Song from description | One sentence, the model adds the rest | Simple |
| Song from description and text | Full control: style, text with tags, tempo, key, length | Custom |
| Instrumental track | No vocals, e.g., background music, film music | Simple or Custom, "Instrumental" field |
| Remix / cover | Preserves the melody and structure of the recording, changes the style | Remix |
| Repaint a segment | Generates selected seconds anew, the rest unchanged; for corrections and lengthening | Repaint |
| Recording as a style reference | You provide a file, the model mimics the sound | Custom, "Reference Audio" field |
| Separating tracks, adding instruments | Extract vocals or drums, add guitar | Extract, Lego, Complete (only base model) |
| Your own style | Learning from several of your recordings (LoRA) | LoRA Training tab |
| Text with timing | LRC file with synchronized lyrics | Auto LRC |
What computer is needed
Requirements according to the project's instructions (INSTALL): Python 3.11 or 3.12, about 10 GB of disk space for models, an NVIDIA graphics card is recommended, but Apple Silicon (MPS and MLX), AMD (ROCm), Intel, and just the processor are also supported. The memory of the card determines what you will run:
| Card memory (VRAM) or shared memory of Mac | What the program will choose | What to expect |
|---|---|---|
| up to 6 GB | Only performer 2B turbo, no planner; INT8 quantization and offloading to CPU | Works, but without Simple mode and without "Think"; you write the description and text yourself |
| 6–8 GB | 2B turbo + planner 0.6B | Full features, slower |
| 8–16 GB | 2B turbo or sft + planner 0.6B or 1.7B | Comfortable operation |
| 16–24 GB | XL models (4B) with better sound quality | High quality |
| 24 GB and more | XL sft + planner 4B | Best quality, everything in memory |
The program automatically detects the hardware and sets the "tier" with appropriate default settings; you can override it in the settings. On a Mac with Apple Silicon, shared memory counts: a Mac with 16 GB behaves like a card with several GB, while a Mac with 64 GB enters the highest tier. Why shared memory on a Mac is convenient for such tasks is explained in the Ollama guide; the principle is the same.
How long it takes: the authors report under 2 seconds for a whole song on an A100 card and under 10 seconds on an RTX 3090. On a Mac with Apple Silicon, in our test, a 30-second instrumental track in Custom mode with "Think" enabled was created in 31.6 seconds: 17.4 s planner, 14.2 s performer. The first run after starting the program is slower because the models load into memory.
Step-by-step installation
There are two paths: a ready package (unzip and run the script) or installation from the repository (three commands in the terminal). Both are described in the project instructions.
Path 1: ready package (Mac with Apple Silicon, Windows)
- Download the package
Links to packages for macOS and Windows are in the Quick Start section of the repository (ACE-Step-1.5.zip for Mac and .7z for Windows, with dependencies installed). Download only from the GitHub repository; the project warns against counterfeit sites.
- Unzip to a folder without Polish characters and spaces
For example, Documents/ACE-Step-1.5. The package weighs several GB, and the models will download upon first start (about 10 GB).
- Run the startup script
Mac: in the terminal, navigate to the folder and run the script for macOS (commands below). Windows: double-click start_gradio_ui.bat.
- Wait for the models to download and open the browser
On the first start, the script downloads the models; then the address will appear in the terminal. Type in the browser
http://127.0.0.1:7860.
chmod +x start_gradio_ui_macos.sh
./start_gradio_ui_macos.sh
The script for macOS automatically sets the MLX engine, which is native acceleration on Apple Silicon, and port 7860 (instructions). An Intel MacBook only runs on the processor and very slowly; ACE-Step makes sense on M1 and newer.
Path 2: from the repository (Mac, Windows, Linux)
Commands from the project documentation. You paste them one by one into the terminal (Mac: Terminal program; Windows: PowerShell; Linux: any terminal). Git is required; on Mac, the system will suggest installing developer tools on first use.
curl -LsSf https://astral.sh/uv/install.sh | sh
powershell -ExecutionPolicy ByPass -c "irm https://astral.sh/uv/install.ps1 | iex"
git clone https://github.com/ACE-Step/ACE-Step-1.5.git
cd ACE-Step-1.5
uv sync
uv run acestep
On Mac, instead of command 3, it is better to use the start_gradio_ui_macos.sh script from the previous section, as it enables MLX. After starting, the address will appear in the terminal; open http://127.0.0.1:7860 in the browser. You close the program with Ctrl+C in the terminal.
Startup settings: .env file
Instead of entering options in the command, you create a .env file in the program folder (a copy of the .env.example file) and write in it which performer and planner model to load, which port, and the interface language. The file will survive program updates (documentation).
ACESTEP_CONFIG_PATH=acestep-v15-turbo
ACESTEP_LM_MODEL_PATH=acestep-5Hz-lm-0.6B
PORT=7860
LANGUAGE=en
With 64 GB of memory and more, you can enter planner acestep-5Hz-lm-1.7B, and on powerful NVIDIA cards, the XL model. Program update: the check_update.sh script in the folder or the git pull command and re-uv sync.
Interface: what is where
When you open the address in the browser, you see one page with three parts: collapsed "Settings," tabs "Generation" and "LoRA Training," and below the results. The screenshots below are from a working installation on Mac.
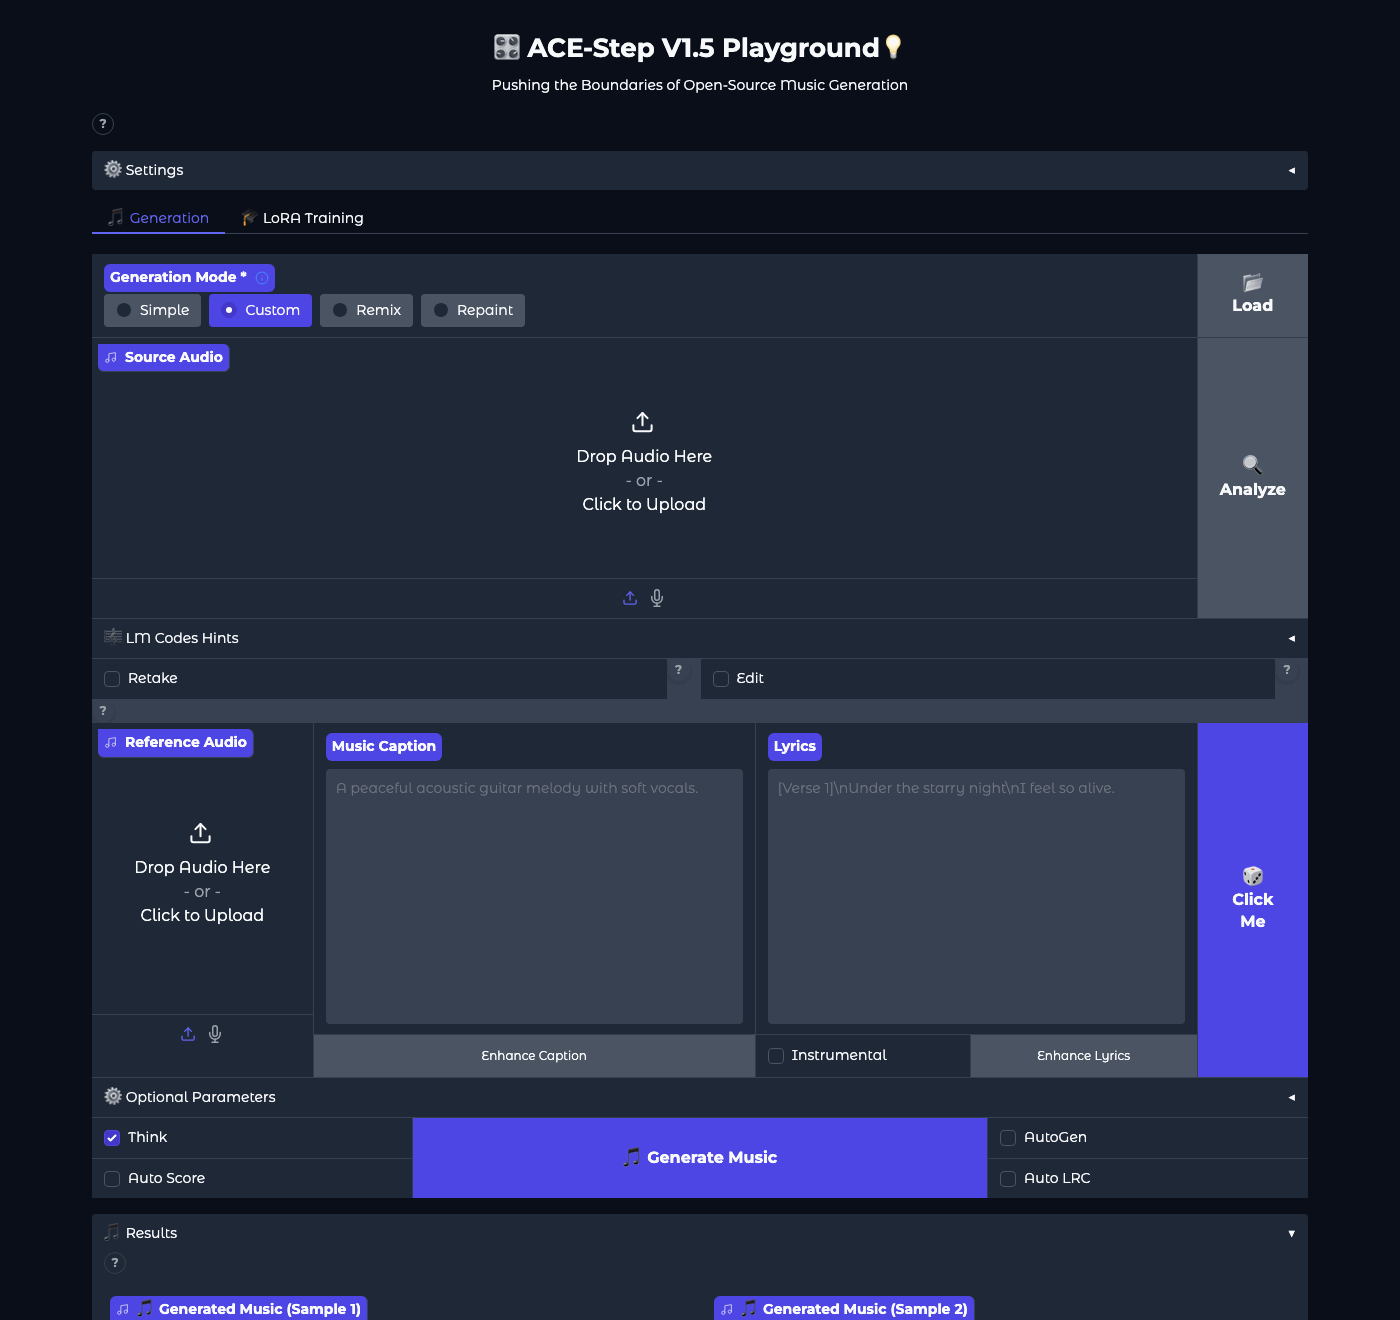
| Element | Purpose |
|---|---|
| Settings (at the top, collapsed) | Model selection, device, quality, and file format settings. You don't need to go there at the start; the program sets default values for your hardware. |
| Generation Mode | Simple, Custom, Remix, Repaint. With the base model also Extract, Lego, Complete. |
| Source Audio | Input recording for Remix and Repaint modes. In Custom mode, it can be left empty. |
| Reference Audio | Recording as a sound reference (optional). |
| Music Caption | Style description: genre, instruments, mood, tempo, vocals. The most important field. |
| Lyrics | Song text with tags [Verse], [Chorus], [Bridge]. The "Instrumental" field disables vocals. |
| Enhance Caption, Enhance Lyrics | The planner expands your short description or text. |
| "Click Me" cube | A random example of description and text, good for learning how to write. |
| Optional Parameters | Tempo (BPM), key, time signature, vocal language, duration in seconds, number of versions (Batch Size). Defaults to "Auto". |
| Think | Enables the planner: the model automatically selects tempo, key, length, and outlines the sketch. Leave it on unless you have low memory. |
| Auto Score, Auto LRC, AutoGen | Automatic quality assessment, file with synchronized text, automatic generation of subsequent parts in the background. |
| Results | Players for each version, buttons Send To Remix, Send To Repaint, Save, list of files to download, and generation times. |
Your first song in three minutes: Simple mode
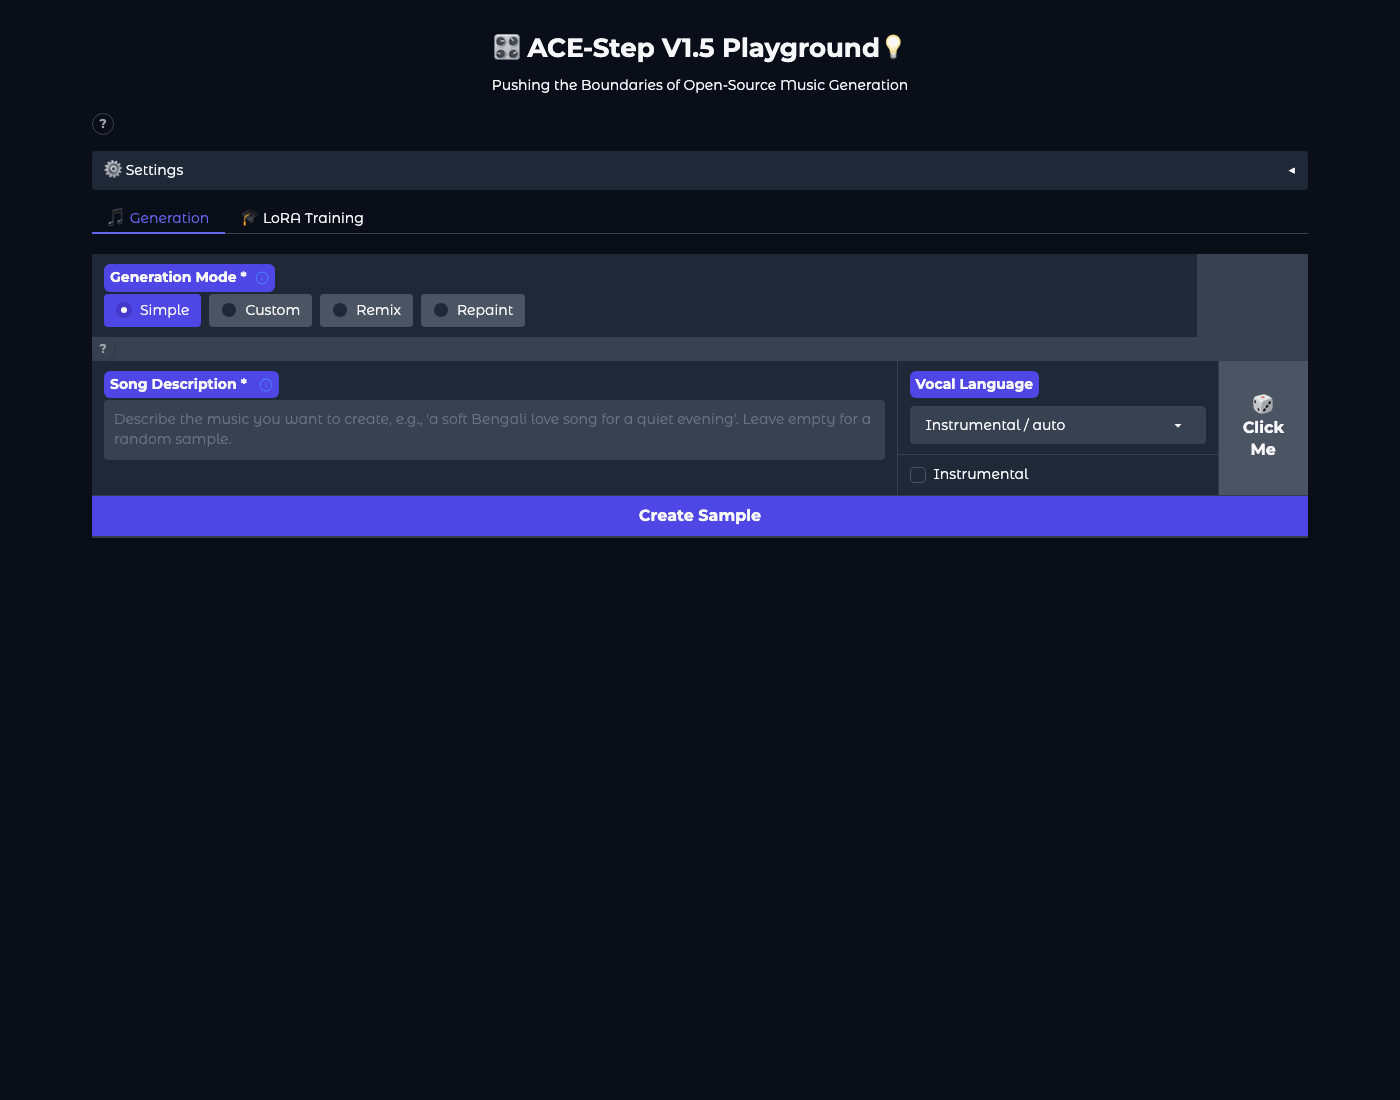
- Select "Simple"
In the Generation Mode row, click Simple.
- Describe the song in one or two sentences
It works best in English, but you can also use Polish. Copy an example from the box below.
- Set the vocal language
In the Vocal Language field, select "pl" if you want singing in Polish, or check Instrumental if without vocals.
- Click "Create Sample"
The planner will create a style description, text, and parameters; you will see them in the expanded fields. You can manually adjust them.
- Click "Generate Music"
The Generation Status field will show progress, and in Results, the players will appear. By default, two versions are created.
- Listen, save, repeat
The Save button saves the file and parameters; "All Generated Files" gives MP3 and a JSON file with settings. Don't like it? Click Generate Music again: each attempt uses a different random seed.
A warm, nostalgic Polish folk-pop song about coming home after years abroad, female vocal, acoustic guitar and accordion, slow tempo, hopeful ending. Lyrics in Polish.
Upbeat summer instrumental for a family travel video, ukulele, hand claps, light drums, bright and playful, 45 seconds.
Full control: Custom mode
In Custom mode, you write two fields yourself: Music Caption (style description) and Lyrics (text with tags). The rest can be left on "Auto." The project tutorial calls the description "the most important factor influencing the music," and the text "the script in time" (tutorial).
How to write a style description (Music Caption)
The description can be a list of words separated by commas or a sentence. A good description combines several dimensions at once; the project tutorial lists them in a table:
| Dimension | Examples (English works best) |
|---|---|
| Genre | pop, rock, jazz, electronic, hip-hop, folk, classical, lo-fi, synthwave, disco polo |
| Mood | melancholic, uplifting, energetic, dreamy, dark, nostalgic, intimate |
| Instruments | acoustic guitar, piano, accordion, synth pads, 808 drums, strings, brass |
| Sound | warm, bright, crisp, airy, punchy, lush, raw, polished |
| Era | 80s synth-pop, 90s grunge, 2010s EDM, vintage soul |
| Production | lo-fi, live recording, studio-polished, bedroom pop |
| Vocal | female vocal, male vocal, breathy, powerful, raspy, choir, duet |
| Tempo | slow tempo, mid-tempo, fast-paced, groovy, driving |
| Structure | building intro, catchy chorus, dramatic bridge, fade-out ending |
Rules from the tutorial: specifics beat generalities ("sad piano ballad with female breathy vocal" instead of "a sad song"); combine several dimensions; adjectives about sound (warm, crisp, punchy) really affect the mix; the less you write, the more the model will invent itself; avoid contradictions ("classical strings" and "hardcore metal" at the same time), and if you want a change of style in the song, describe it as a progression over time: "starts soft, builds into…".
Polish pop ballad, female vocal, warm and intimate, piano and soft strings, slow tempo, builds into an emotional chorus with drums, polished studio production
Modern dance-pop, male vocal, driving four-on-the-floor drums, bright synths, punchy bass, catchy chorus, 120 BPM feel, radio-ready mix
How to write lyrics (Lyrics) with tags
The lyrics are divided into sections with tags in square brackets. The tag tells the model what part it is and how to sing it. The most common according to the tutorial: [Intro], [Verse], [Pre-Chorus], [Chorus], [Bridge], [Outro], as well as [Build], [Drop], [Breakdown], [Instrumental], [Guitar Solo], [Piano Interlude], [Fade Out]. The tag can be specified with a dash, e.g., [Chorus – anthemic] or [Bridge – whispered], but avoid stacking descriptors: [Chorus – anthemic – stacked harmonies – epic] confuses the model and may be sung as words. The style description and text cannot contradict each other (violins in the description and [Guitar Solo] in the text is a conflict).
[Intro]
[Verse 1]
Za oknem znowu pada deszcz
A ja liczę dni do lata
Walizka stoi przy drzwiach
Bilet w kieszeni, mapa świata
[Pre-Chorus]
Tyle lat, tyle miast
A serce wciąż w tym samym miejscu
[Chorus – anthemic]
Wracam do domu, wracam do siebie
Tam gdzie mnie znają po imieniu
Wracam do domu, pod nasze niebo
Nie potrzebuję już nic więcej
[Verse 2]
Mama zostawi światło w kuchni
Tata nastawi stary radiomagnetofon
Sąsiad zapyta jak tam za oceanem
A ja powiem: dobrze, ale tu jest dom
[Chorus – anthemic]
Wracam do domu, wracam do siebie
Tam gdzie mnie znają po imieniu
[Outro – soft]
Wracam do domu
[Intro – soft piano]
[Build – strings enter]
[Drop – full band]
[Breakdown – piano only]
[Outro – fade out]
The "Enhance Lyrics" button asks the planner to expand your text sketch; "Enhance Caption" does the same for the description. It is worth using them when you don't know how to start, and then manually adjust the result.
Optional Parameters: tempo, key, length, number of versions
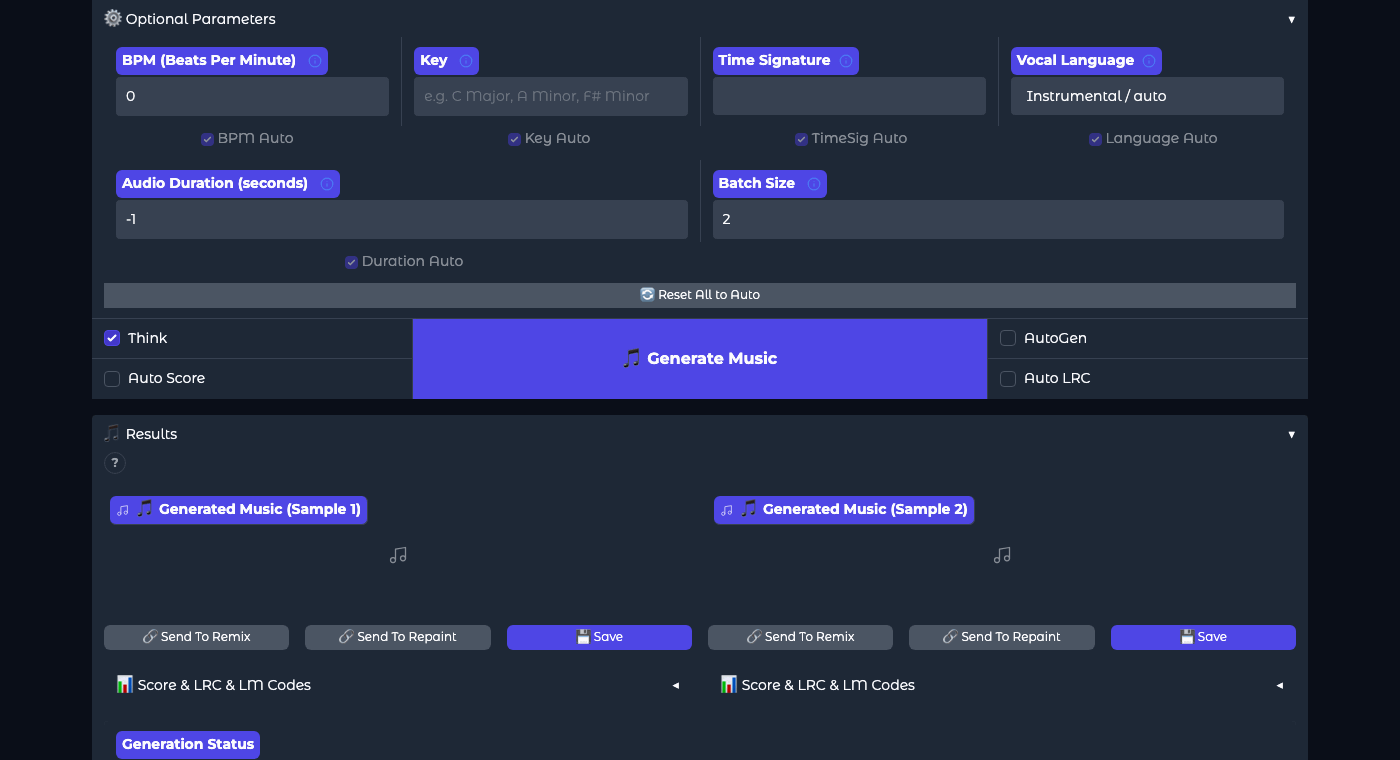
- BPM, Key, Time Signature: tempo, key (e.g., "C Major", "A minor"), time signature (2, 3, 4, 6). Leave it on Auto unless you know what you want; when setting manually, uncheck the appropriate "Auto".
- Vocal Language: vocal language; "pl" for Polish. Auto usually detects the language from the text.
- Audio Duration: length in seconds, from 10 to 600; -1 or Auto means the planner will choose the length based on the text. For starters, 30–60 seconds: you'll see the effect faster.
- Batch Size: how many versions at once, from 1 to 8. Each version is a different random seed; with 2–4, you choose the best one. More versions proportionally require more memory and time.
Results: what you will see after clicking Generate Music
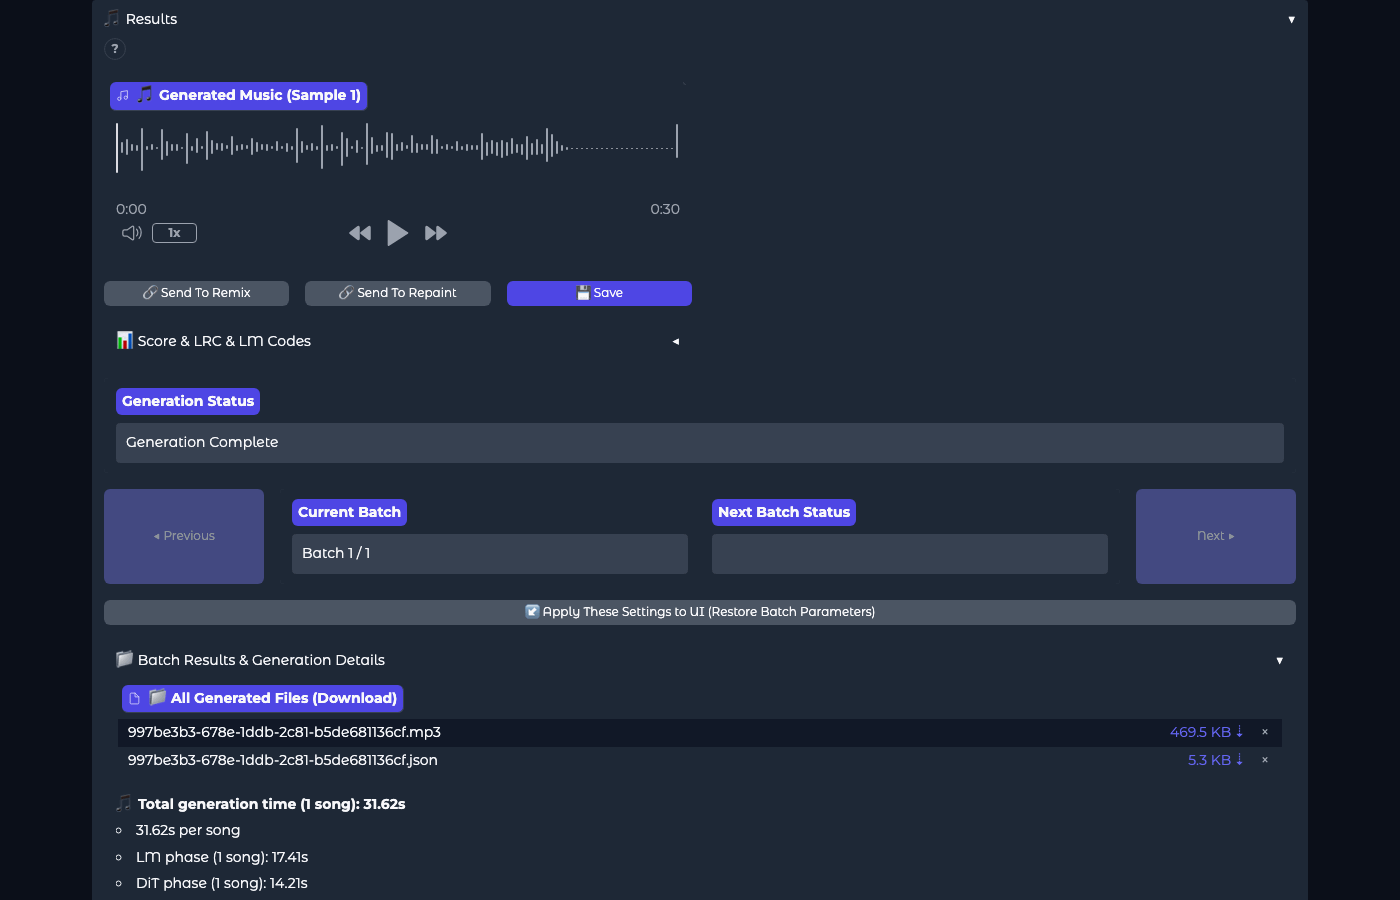
- Player for each version, with a sound wave and speed control.
- Send To Remix sends the result as a source recording to Remix mode (new style, same melody); Send To Repaint to Repaint mode (improving a segment). Save saves the version with parameters.
- Score & LRC & LM Codes: quality assessment (if Auto Score is enabled), file with synchronized text (Auto LRC), and "codes" from the planner that can be pasted back to preserve the melody when changing styles.
- Apply These Settings to UI restores the parameters of this batch to the fields; with the saved seed, you can recreate the same song.
- All Generated Files: MP3 (default 128 kbps, 48 kHz; format and quality can be changed in Settings) and JSON with full parameters.
The files also end up in the gradio_outputs folder in the program directory.
Settings: what is worth knowing and what not to touch
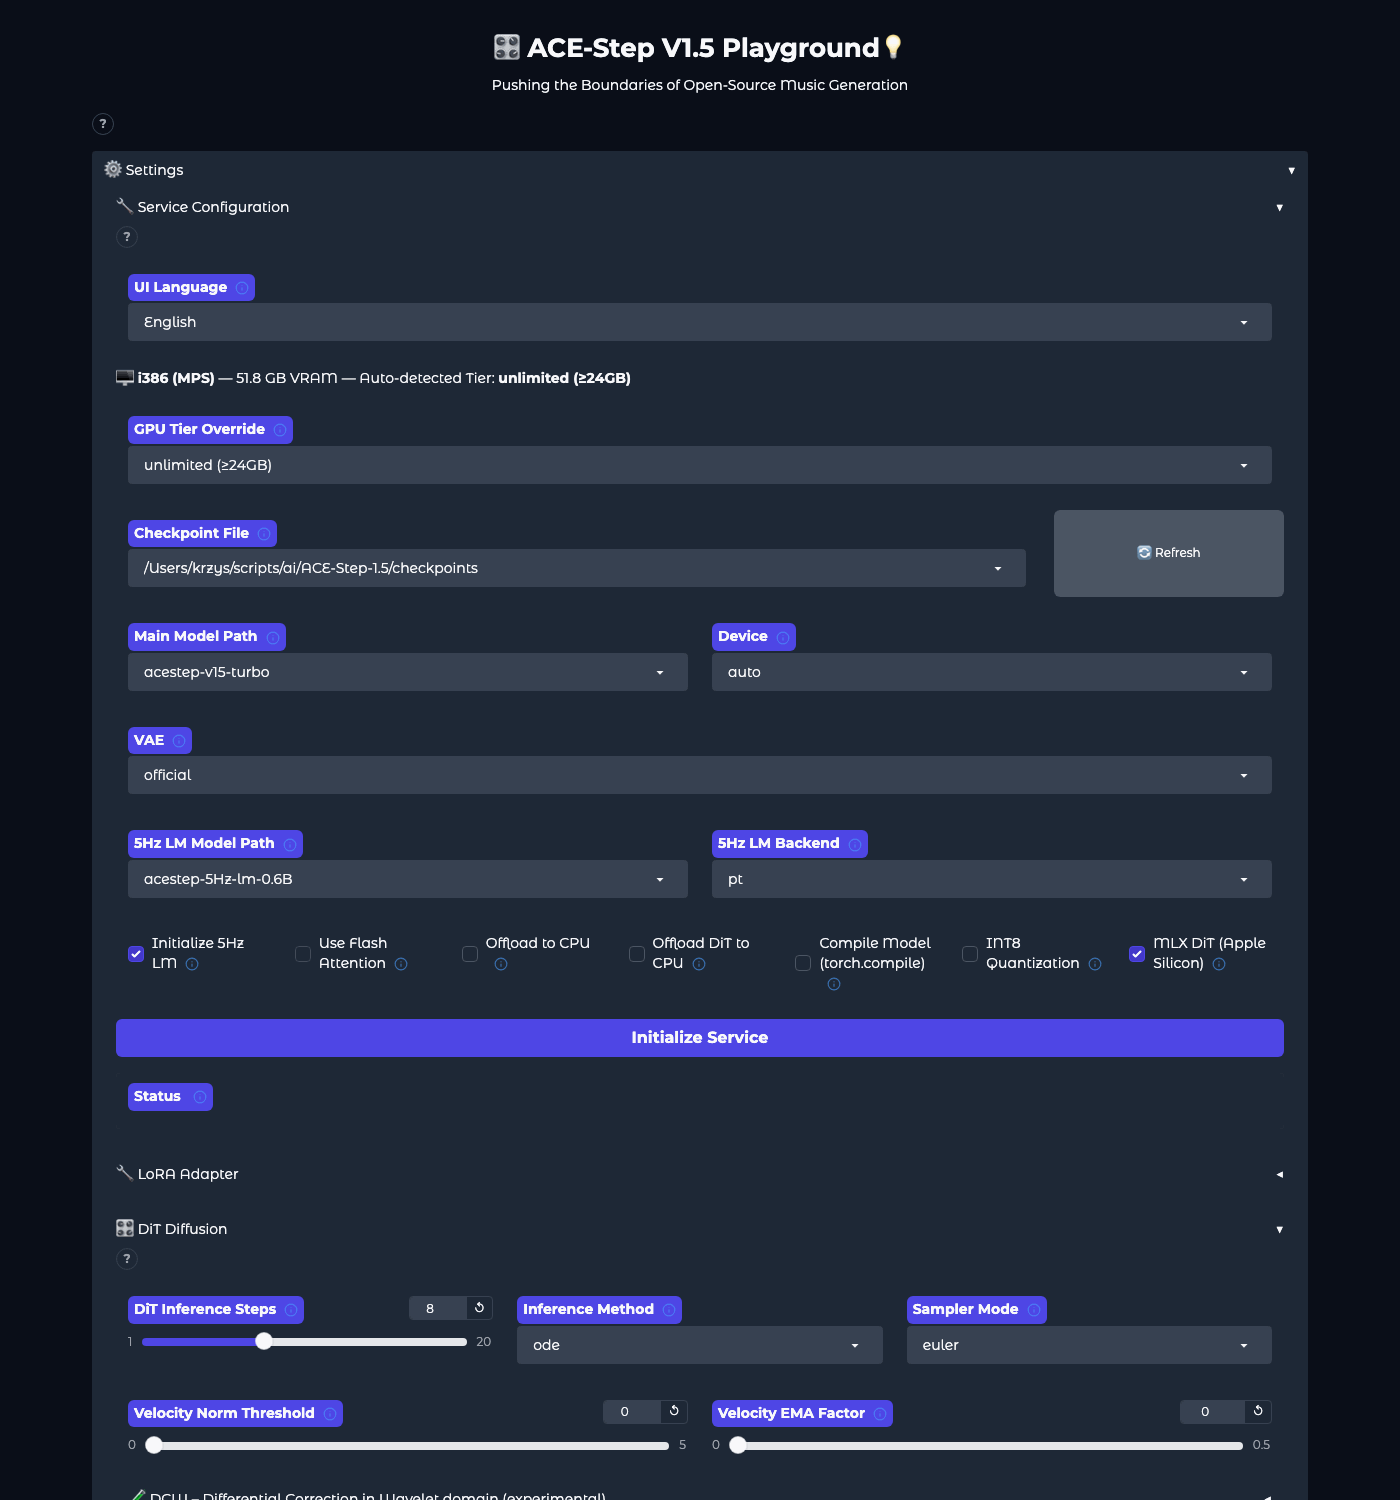
| Setting | What it does | Advice for beginners |
|---|---|---|
| UI Language | Interface language: English, Chinese, Japanese, Portuguese, Hebrew | Leave it in English; Polish is not yet available |
| GPU Tier Override | Manual setting of hardware tier | Do not touch; the program detects it automatically |
| Main Model Path | Performer: turbo (8 steps, fast), sft and base (50 steps), XL (better quality, more memory) | Start with turbo |
| 5Hz LM Model Path and Backend | Planner 0.6B, 1.7B, or 4B; engine pt, vllm (NVIDIA), mlx (Mac) | Smaller planner on weaker hardware; mlx on Mac |
| Initialize 5Hz LM | Loads the planner; needed for Simple mode and "Think" | Enabled if hardware allows |
| Offload to CPU, INT8 Quantization, Compile Model | Memory saving and speeding up | The program enables them automatically on weaker cards |
| MLX DiT (Apple Silicon) | Native Apple engine for the performer | Enabled on Mac |
| Initialize Service | Loads models after changing settings | Click after each model change; the status will show if it succeeded |
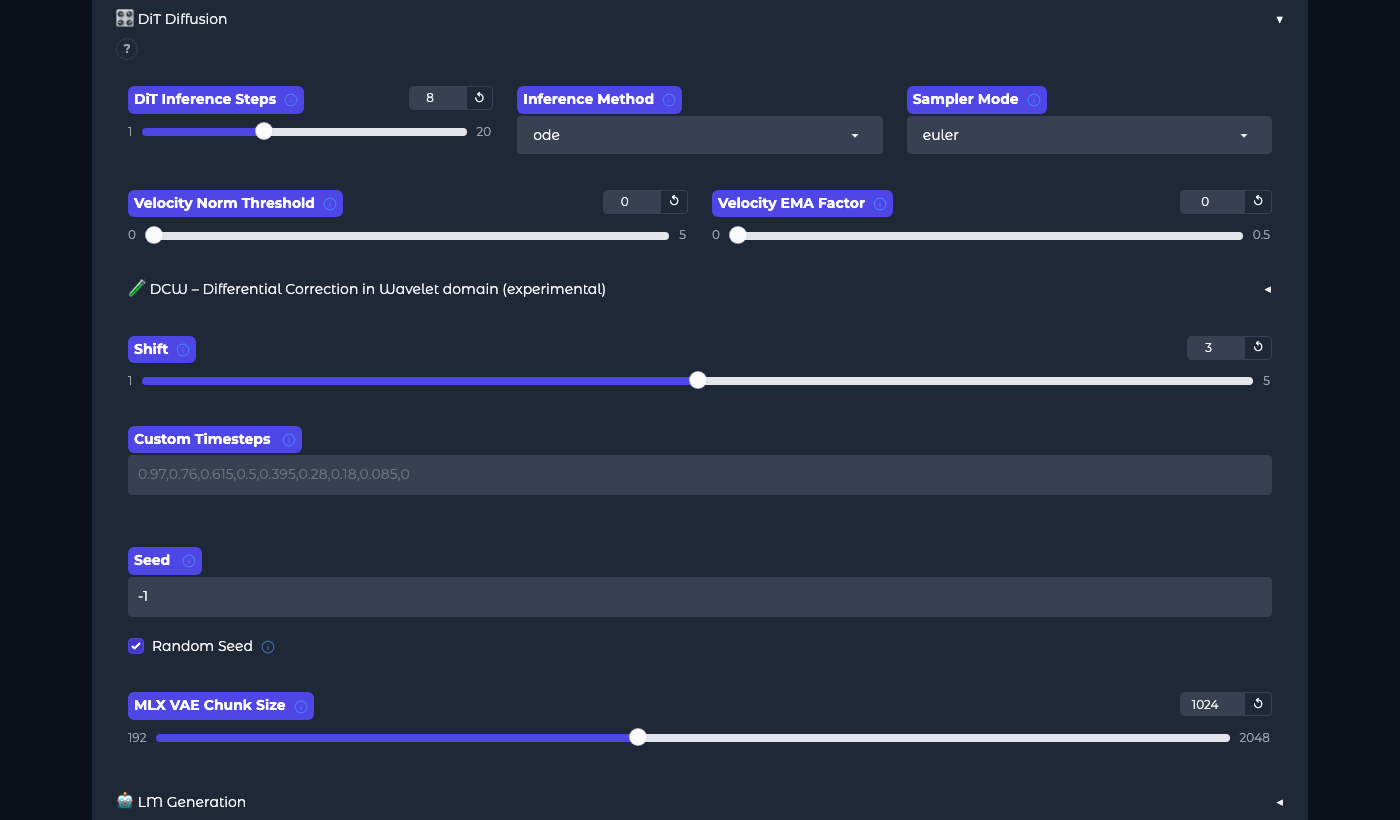
Performer parameters according to the tutorial: Inference Steps 8 for turbo (more steps means more accuracy and slower; base uses 32–100); Guidance Scale only works with base and sft models (higher = closer to the description); Shift 3.0 recommended for turbo; Seed is a random seed: with Random Seed, each attempt is different, with a number entered, the same. The tutorial advises: when testing the impact of one parameter, set a fixed seed, otherwise randomness will mask the change.
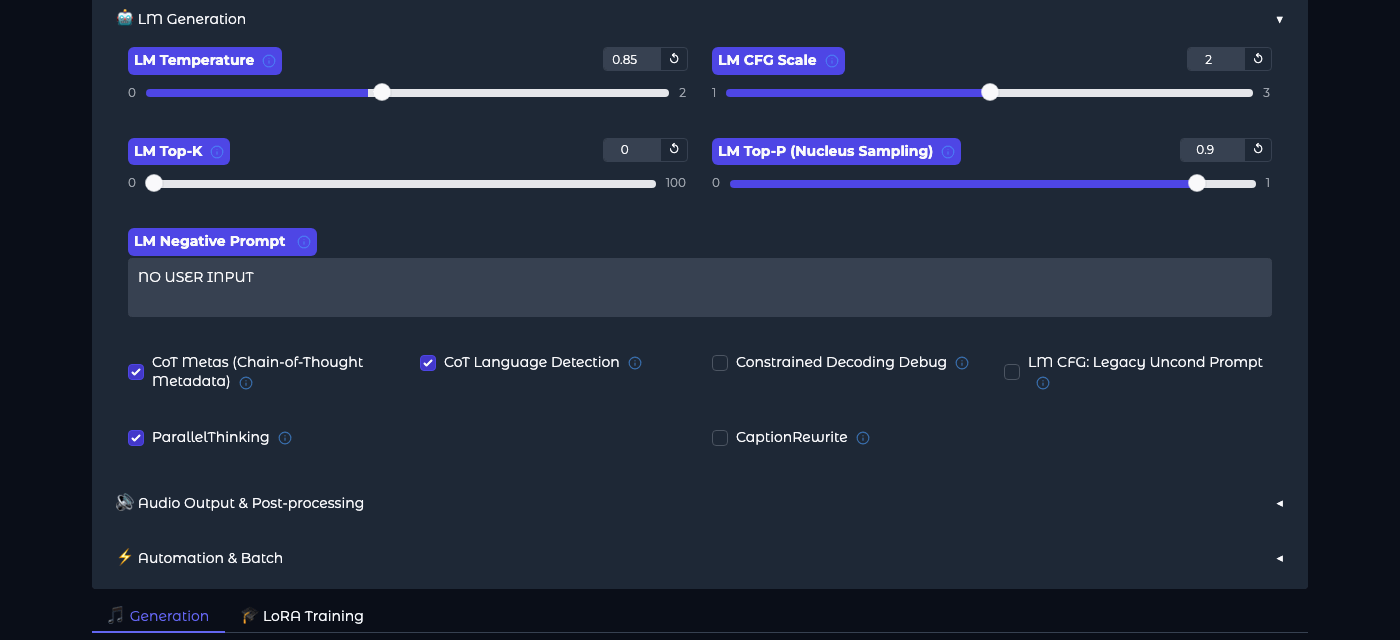
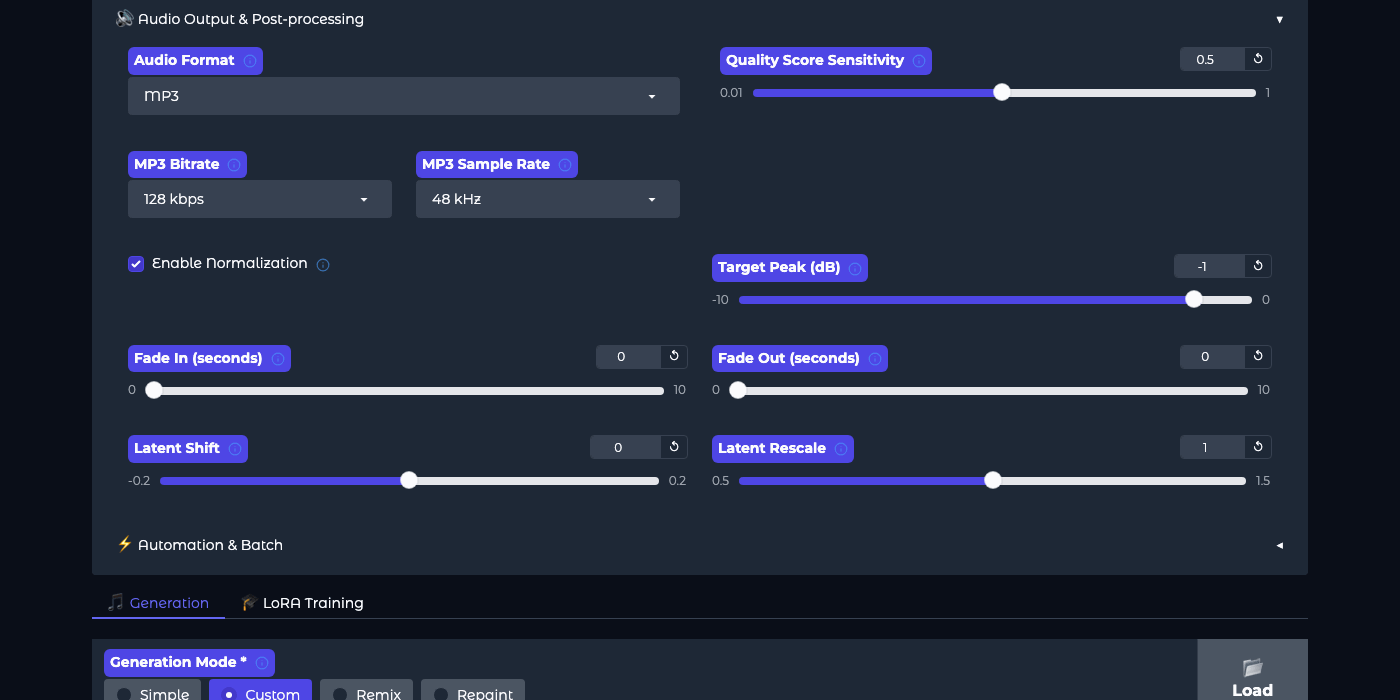
Next steps: remix, repaint, your own style
Remix – upload a recording (or click Send To Remix on your own result), write a description of the new style, set the strength (higher = closer to the original structure), and generate. This mode is for covers and "the same song in a different genre."
Repaint – upload a recording, specify seconds from and to (-1 = to the end), describe what should be in that segment, choose conservative, balanced, or aggressive mode and strength. For correcting a failed chorus without affecting the rest and for lengthening the song.
Reference Audio – in Custom mode, upload a recording as a sound reference; the model mimics the timbre and character, not the melody.
Multiple versions and automatic scoring – the tutorial recommends: set Batch Size to 2–8, enable Auto Score and AutoGen, and the program will generate subsequent parts in the background with new seeds and assess them; you review the results and choose the best ones. The authors particularly recommend the result "DiT Lyrics Alignment," which indicates how accurately the vocals match the lyrics.
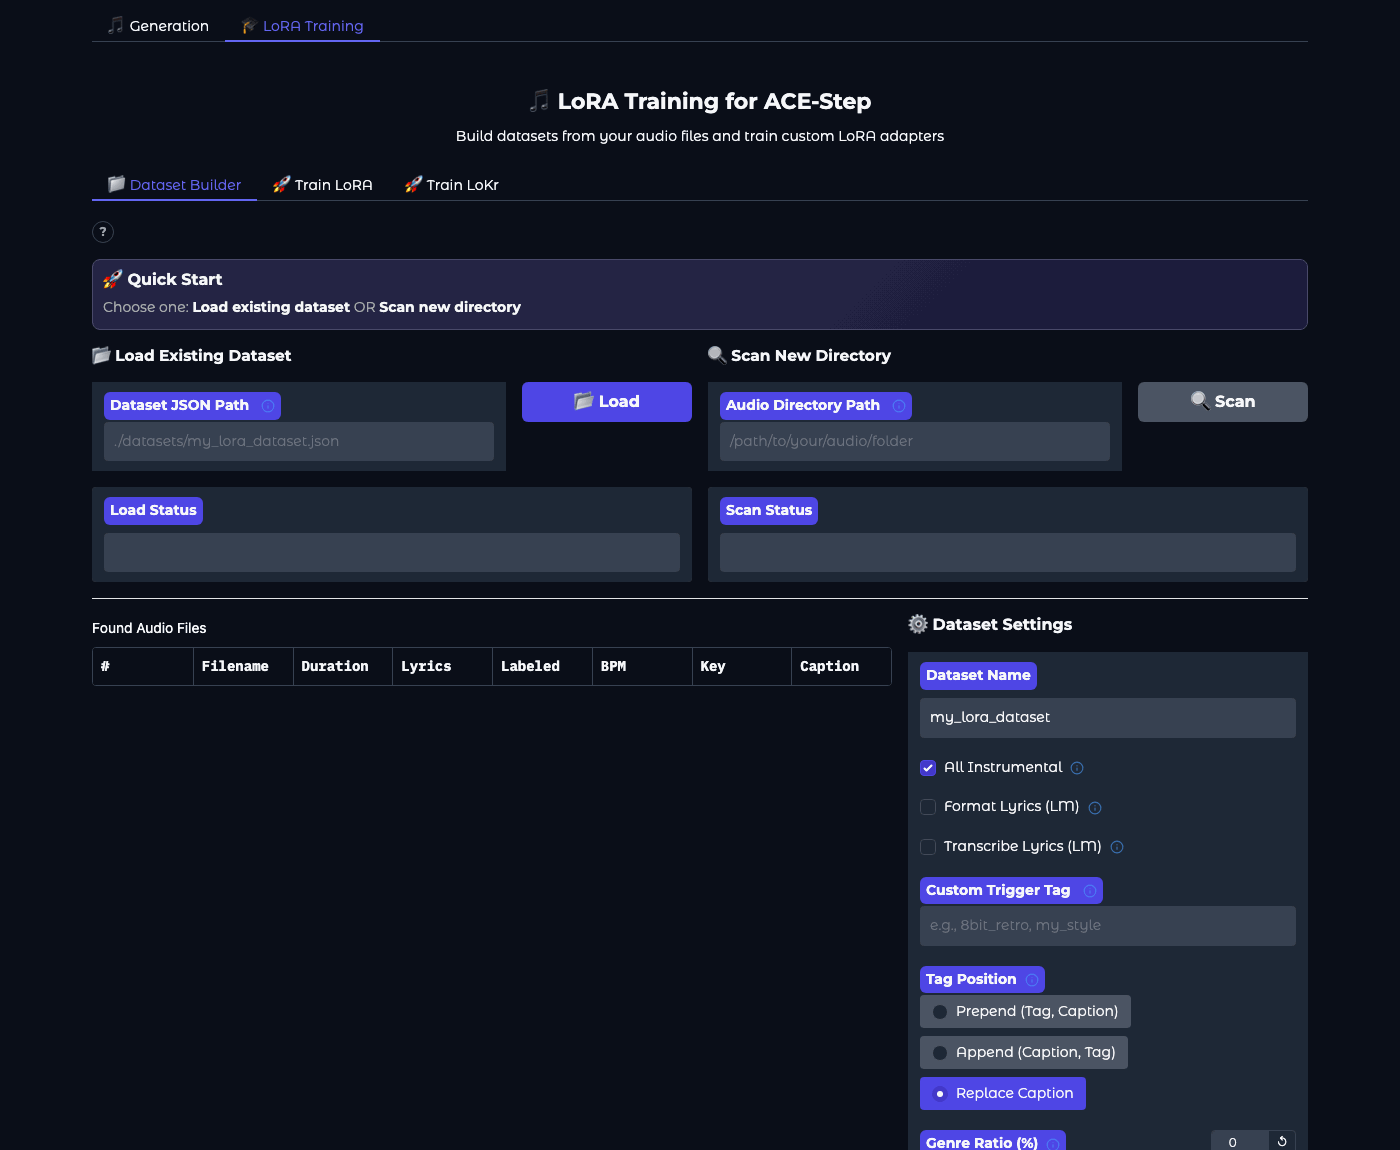
LoRA: your own style – in the LoRA Training tab, point to a folder with several of your recordings (e.g., 8 tracks), the program describes them, processes them, and trains a small "adapter," which you then load in Settings. According to the documentation, on an RTX 3090 card with 12 GB, this takes about an hour; on Mac, longer. The adapter cannot be loaded with INT8 quantization enabled (interface guide, LoRA tutorial). Train on recordings you have rights to.
Legal and ethical aspects: what you can do with the track
- The program and model are under the MIT license, so you can use them commercially as well. However, the authors ask to check the originality of the results, disclose AI involvement, and obtain permissions when mimicking protected styles or materials (documentation, License & Disclaimer section).
- Do not enter artist names as "do like X" for publication; describe the style with features (era, instruments, sound). For private experiments, this does not matter, but it does for releasing a track.
- Streaming services have their own rules regarding AI music; check them before submission.
- The only official site of the project is its repository and project page on GitHub. The authors warn against counterfeit domains with payments.
Common issues
| Symptom | Cause and what to do |
|---|---|
| The page 127.0.0.1:7860 does not open | The program is still loading or did not start. Check the terminal window: the address appears after loading; errors too. Port occupied? Change PORT in the .env file. |
| “Generate Music” does nothing | Models not loaded. Expand Settings, click Initialize Service, and wait for status “[OK] Model initialized.” |
| Simple mode or “Think” unavailable | Not enough memory for the planner; the program automatically disabled it. Write the description and text yourself in Custom mode or choose a smaller planner 0.6B. |
| The vocal sings in English, although the text is Polish | Set Vocal Language to “pl” and uncheck Language Auto; add in the description “Polish lyrics, Polish vocal.” |
| The vocal sings the names of the tags | Too many descriptors in the tags. Leave [Chorus – anthemic], move the rest to the style description. |
| The track cuts off or is too short | Set Audio Duration manually (uncheck Duration Auto) or shorten the text; use Repaint from the end to lengthen. |
| Very slow | Too large a model for the hardware. Go back to turbo and planner 0.6B, reduce Batch Size to 1, shorten the length. On Mac, check that MLX DiT is enabled. |
| No disk space | Models take about 10 GB, and each version is a new file in gradio_outputs. Clean the output folder. |
Frequently asked questions
Is it really free?
Yes. The program and models are open under the MIT license; there is no account, subscription, or limits. You pay with hardware and electricity. The authors also run a free online version, but this guide is about the local version.
Does it sing in Polish?
Yes, Polish is among the supported languages; pronunciation quality varies and is best in the largest languages. Setting the language to “pl,” correct text with Polish characters, and avoiding abbreviations helps.
Mac or PC?
Both work. A Mac with Apple Silicon and 16 GB or more provides full features without configuration, thanks to MLX; a 30-second track in about half a minute. A PC with an NVIDIA card is faster (a few seconds per track on a powerful card) and allows for XL models with 20 GB and more. A Mac with an Intel processor is too slow.
What is the difference between turbo, base, and sft?
Turbo creates sound in 8 steps and is the fastest, with high quality; sft and base in 50 steps, base is the most “creative” and the only one that supports separating and adding tracks. For everyday use, turbo; for experiments, base.
What is “Think”?
A switch for the planner. When enabled: the model automatically selects tempo, key, length, and outlines the sketch of the song, improving consistency. When disabled: the performer works directly from your description and text, faster and with less memory. It is skipped in Remix and Repaint modes.
Can I use the results in YouTube videos or advertising?
The license allows it. The authors ask to check originality and disclose AI involvement; platforms have their own rules for AI-generated content. For commercial use, consult a lawyer, especially if the track mimics a recognizable style.
Do I need to know how to program?
No. Installation is pasting three commands or unpacking a package; then everything happens in the browser.
Fact-check summary
- For sure true: ACE-Step 1.5 is an open project under the MIT license; it works locally on NVIDIA, Apple Silicon, AMD, and Intel; the interface runs at 127.0.0.1:7860; it creates tracks from 10 seconds to 10 minutes, up to 8 versions at once, in over 50 languages; it has Simple, Custom, Remix, and Repaint modes, as well as LoRA training. Screenshots and times from the test come from a working installation on Mac.
- Probably true as of the verification date: the hardware tier table and default models; about 10 GB for models; times below 2 s on A100 and 10 s on RTX 3090 according to the authors. New versions may change this.
- What is uncertain: the quality of Polish pronunciation in a specific track; generation time on your computer; availability of portable packages at a given moment.
- Common myth: “free AI music is free from legal risk.” The program's license allows use, but the responsibility for originality and for mimicking protected styles lies with the user.
Sources
| Source | Type | Credibility |
|---|---|---|
| ACE-Step 1.5 – repository and main documentation | Official | High |
| ACE-Step 1.5 – installation instructions | Official | High |
| ACE-Step 1.5 – Gradio interface guide | Official | High |
| ACE-Step 1.5 – tutorial (description, text, parameters) | Official | High |
| ACE-Step 1.5 – LoRA training tutorial | Official | High |
| ACE-Step 1.5 – project page | Official | High |
| ACE-Step 1.5 – models on Hugging Face | Official | High |
| ACE-Step 1.5 – technical report | Scientific publication | High |
| uv – Python package manager | Official | High |
Comments (0)
No comments yet. Be the first!