
Do you want to make an AI film but don’t know what "24 mm", "medium shot", or "zoom" means? Start here. In four images, you will see why sometimes the whole person and place are visible, and other times almost just the face. Then you will learn to describe such a frame in plain words and use ready prompts for your own film. You don’t need a camera or photographic experience.
Last verification: October 4, 2026. The given focal lengths are equivalents for full frame. The illustrations below were generated using AI as examples of composition; they are not photographs taken with four physical lenses or a calibrated optical test. The video model may interpret the number of millimeters freely, so always assess the actual frame.
To start: what are you deciding on?
Imagine you are recording a friend standing in a square. You can show the whole square and a small figure, approach the figure from the waist up, or fill the screen with just the face. In each case, it’s the same person and the same place, but the viewer receives different information. A wide shot answers the question "where are we?", a medium shot allows you to see "what is she doing?", and a close-up shows "what is she feeling?".
A frame is simply a portion of the world visible in the rectangle of the film. Focal length affects how wide a portion of the scene the lens sees. The distance of the camera tells us from where we are looking at the character. These three things work together but do not mean the same thing. When creating a video with AI, you provide the model with their description in words instead of turning the knob of a real lens.
Don’t just write "135 mm". Also write: "the person is visible from the shoulders up, the entire head remains in the frame". The model then receives a clear task, and you can check if it was executed.
First, see the difference
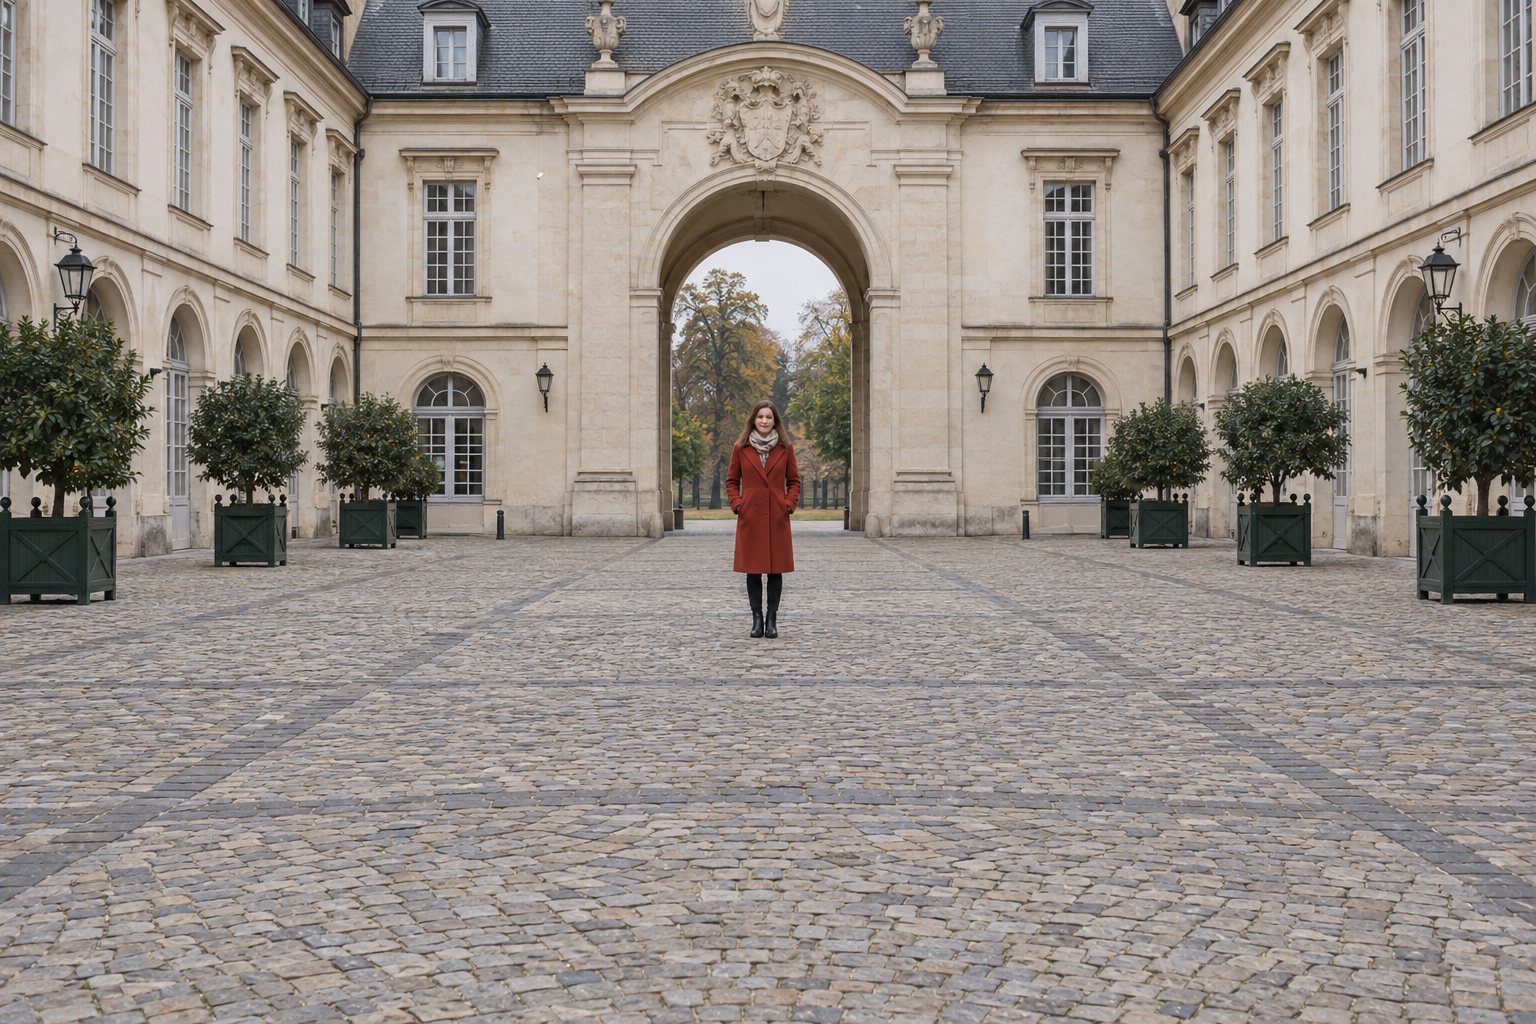
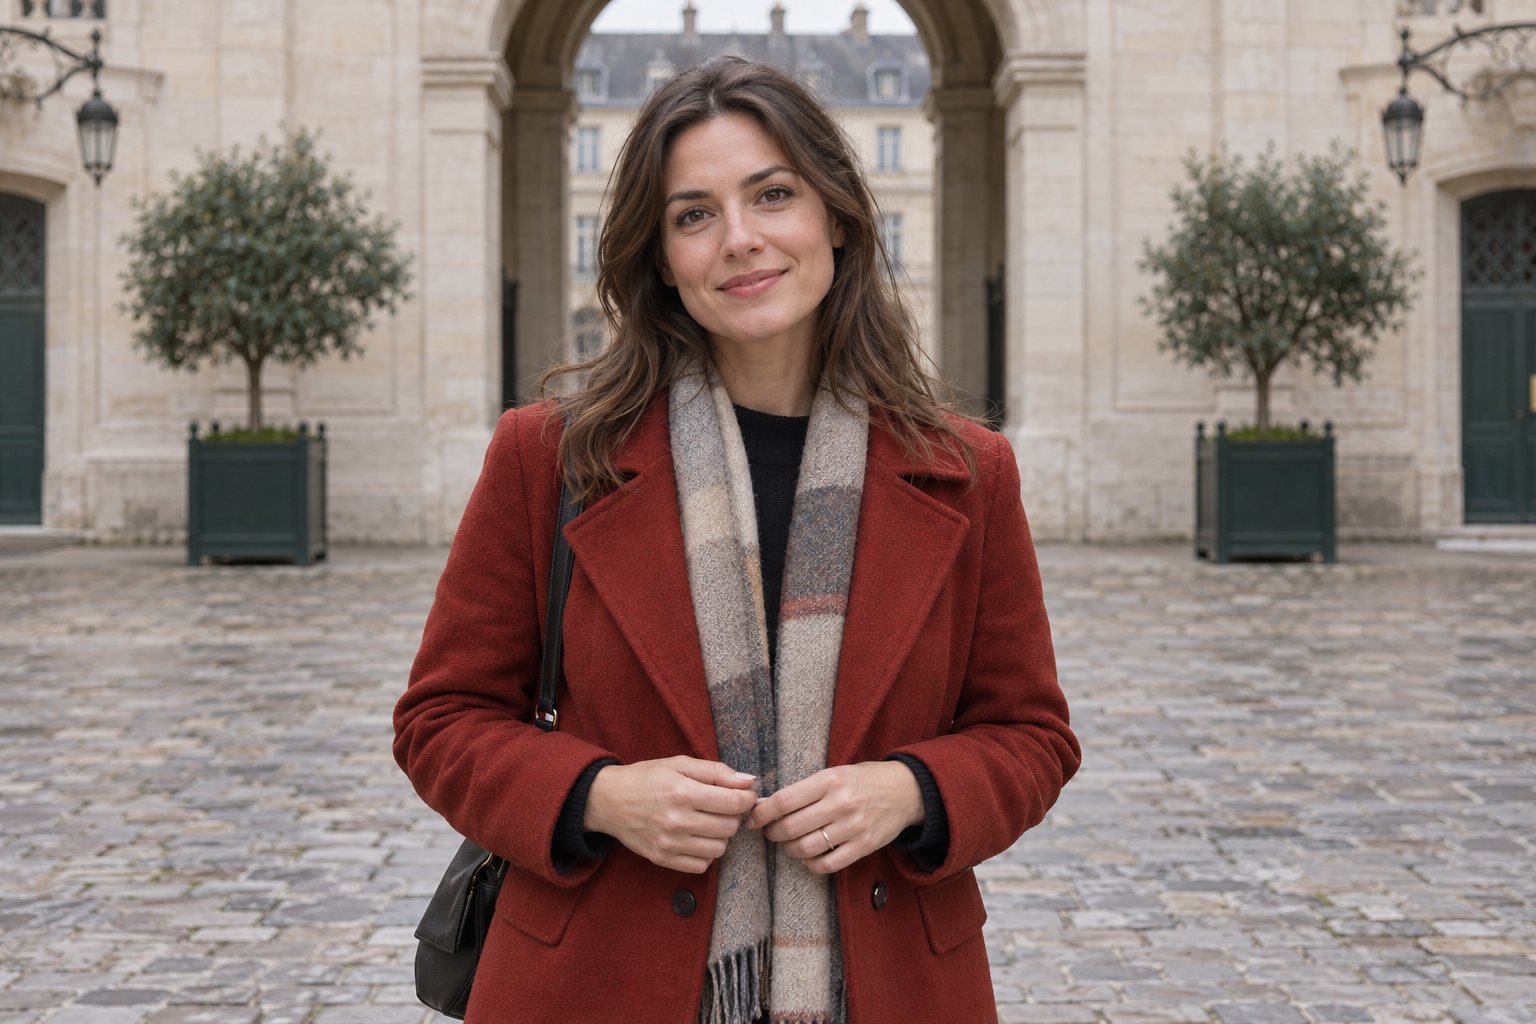
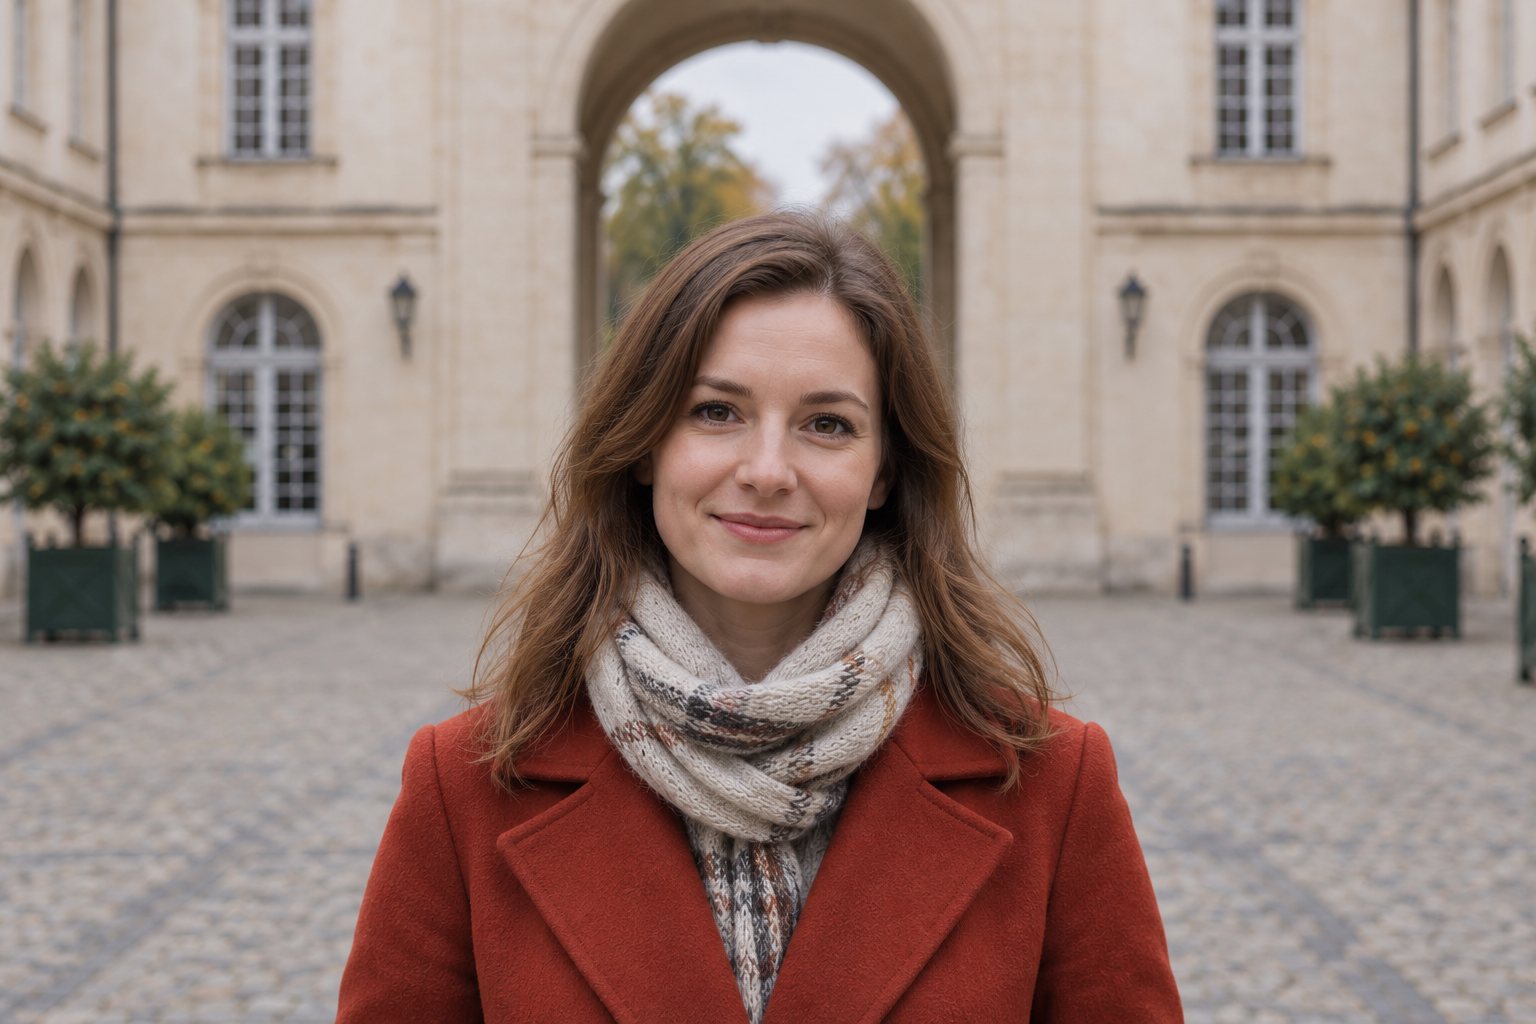
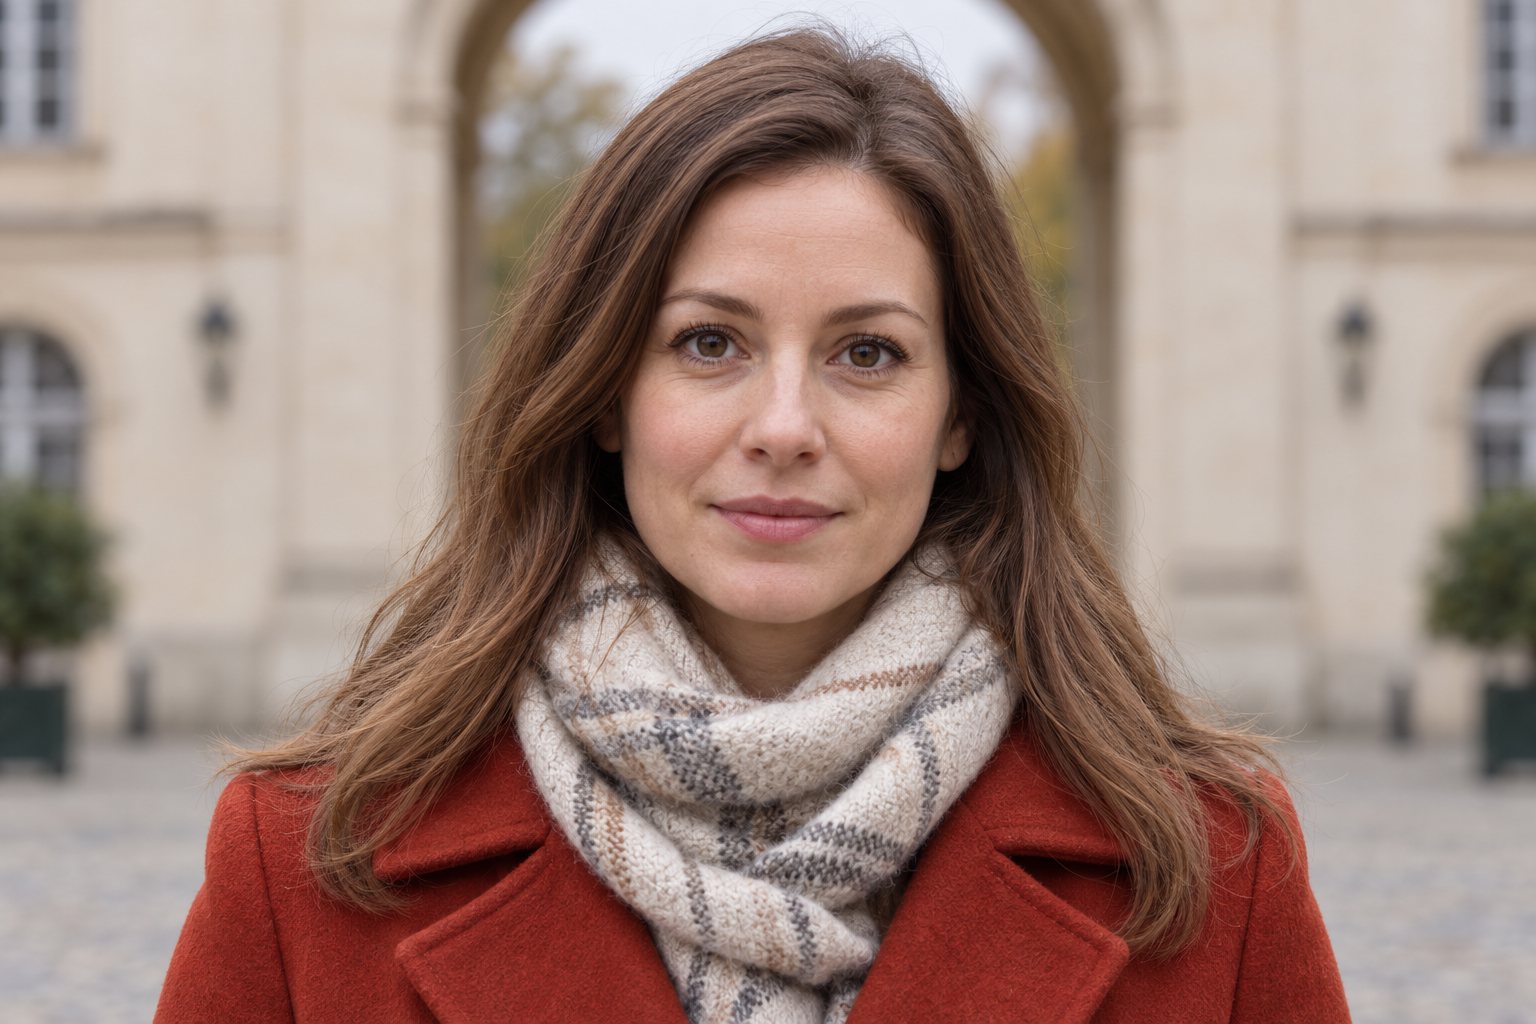
In each example, the character stands in a courtyard, and the camera looks toward her. The images show the practical application of four types of framing: from wide shot to tight portrait. These are separate AI visualizations, so they may differ in minor facial and environmental details. Later, we will show how to prepare a fairer comparison with the camera position unchanged.
How to read these four images
- Look at the person: how much space do they occupy in each rectangle? In the first image, she is small; in the last, the face dominates.
- Look at the courtyard: how much pavement, walls, and trees can you still see? The background is an important part of the first story, while in a tight portrait, it becomes just context.
- Look at the hands and feet: in a wide shot, they are fully visible; in a close-up, their absence is a deliberate choice. If the gesture of the hands matters, do not choose a frame that cuts them off.
Focal length is not a measure of quality. 200 mm is not "better" than 24 mm. Each frame answers a different question from the viewer. First, decide what the viewer needs to see, and only then choose the number of millimeters.
1. What do the millimeters mean?
Focal length is a property of the lens, expressed in millimeters. With the same sensor size, a shorter focal length gives a wider field of view, while a longer one gives a narrower angle and a larger image of the object in the frame. Nikon describes this relationship as a change in the angle of view and magnification. However, the number alone does not tell you whether you will see the whole figure or just the face: the distance of the camera from the person also matters.
A lens is the part of the camera through which light enters. A sensor is the surface on which the camera records the image. Think of the sensor as a rectangular screen behind the lens. If the lens "sees" wide, a lot of the environment fits on that rectangle. If it "sees" narrowly, it records a smaller portion of the scene, so the person occupies more space in the finished image.
A simple image from life: stand in the doorway of a room and look straight ahead. A wide shot resembles showing the whole room. A tight shot resembles showing only the person by the window. You don’t need to move that person to change what the image encompasses. However, if you approach her, the point from which you view the room will also change.
In this guide, 24, 70, 135, and 200 mm represent full-frame equivalents. This is a common point of reference. If the AI tool does not provide the sensor size, treat these numbers as a visual language rather than a guarantee of strict angles of view.
"Full frame" is the sensor size used as a comparative standard. The same physical lens may show a different portion of the scene on a smaller sensor, which is why we provide a common point of reference when comparing millimeters. When creating an AI film, you do not need to calculate the sensor size: entering "full-frame equivalent" simply helps maintain a consistent language across the four prompts.
| Focal Length | Useful Starting Point | What to Add in the Prompt |
|---|---|---|
| 24 mm | Wide shot with surroundings | Whole figure from head to toe; readable building, street, or room |
| 70 mm | Medium shot | Frame roughly from the waist up; full head and both hands |
| 135 mm | Close-up on reaction | Frame from the shoulders up; eyes and expression clearly visible |
| 200 mm | Tight portrait from a distant camera position | Head and shoulders fill most of the frame; camera remains far away |
These are narrative suggestions, not laws of optics. You can make a full-body shot at 135 mm if you set the camera farther away. You can also make a close-up at 24 mm if you get very close – but then the perspective of the face and the relationship of the foreground to the background will change.
Words that will appear in the prompts
| Word | Meaning without photographic jargon |
|---|---|
| Wide shot | The person is visible along with a large part of the place where they stand. |
| Medium shot | Usually shows the face, part of the torso, and hand gestures. |
| Close-up | The most important are the face and its expression; the surroundings are less visible. |
| Perspective | How close and far things look relative to each other from the chosen camera position. |
| Sharpness | The part of the image whose details are clear, e.g., the eyes. |
| Background blur | The background is soft and less detailed, but does not have to disappear completely. |
| 9:16 / 16:9 | Aspect ratios: the first is vertical like a phone, the second is horizontal like a TV screen. |
When reading a prompt, do not try to memorize all the terminology. Just answer three questions: what should be visible, where is the camera looking from, and what should move?
2. Frame, focal length, and distance are three different decisions
Size of the character in the image
"Close-up" describes what you see in the finished frame. "135 mm" describes the type of lens whose look you want to evoke. Neither of these terms alone establishes the distance of the camera. Therefore, write both: "close-up from the shoulders up, look of a 135 mm lens, whole head in the frame".
Perspective
If the camera and character remain still, and you only change the focal length, the portion of the scene changes. The positioning of objects relative to each other in perspective remains the same. The characteristic feeling of "compressed background" with a telephoto lens often results from the photographer stepping back to maintain a similar size of the character. Changing the camera position changes the perspective. This is an important difference when making AI comparisons.
Imagine a person standing in front of a large arch. If you stay in place and only show a narrower portion of the photo, the arch will not shift relative to her head. If you step back far and use a longer focal length to keep the person the same size, the arch may appear larger and "closer" behind her. This is the effect of the new camera position. Such a comparison only makes sense if you know what has been changed.
Background blur
A soft background does not automatically result from entering "200 mm". Depth of field – the range of space that appears sharp – is also influenced by aperture (the size of the opening letting in light), focus distance, sensor size, and the distance of the background from the character. In the prompt, specify the result separately: "eyes sharp, background gently blurred" or "background still recognizable".
If these concepts are new, you do not need to know their numbers. In practice, for the AI model, a simple sentence will suffice: "eyes clear, stone arch behind the person still recognizable". This better describes the desired outcome than just "shallow depth of field".
Frame format
9:16 shows a different portion of the surroundings than 16:9, even with a similar focal length impression. Enter the aspect ratio and check if hands, head, or feet do not fall off the screen. Especially in vertical video, "waist-up shot" does not always leave room for gestures of both hands.
3. How to write a prompt that truly controls the frame
The practical order is: type of shot → focal length → frame boundaries → place and action → camera movement → things that must remain constant. Do not mix the description of the initial image and the description of movement in one long sentence.
A prompt is a simple instruction typed into the AI tool. It does not have to be literary or full of technical words. The most important thing is that after generation, you can answer "yes" or "no": is the whole shoe visible? are both hands in the frame? did the camera move when it was supposed to stay? The more specific the questions, the easier the correction.
[Type of shot] with the look of a [focal length] mm lens, full-frame equivalent. The character is visible from [top boundary] to [bottom boundary]. The frame must include [important elements]. The camera is [position and distance] and looks [direction]. The character [one simple action]. The camera [one type of movement or no movement]. Format [9:16 / 16:9], duration [number of seconds]. Without changing the focal length during the shot.
In the video model, the number of millimeters is an aesthetic hint. If the result shows a different size of the character than you intended, first correct the frame boundaries and camera position, and only then experiment with the number of millimeters.
First attempt: make one frame, without a film
Before asking for movement, create a still image. This is a much easier test: you immediately see if the model understood the size of the character and the place. Open the image generation tool, choose a horizontal format of 16:9, and paste a short prompt. You can use any generator that allows you to describe an image in text.
Horizontal image 16:9. An adult woman in a red coat stands in the middle of a stone courtyard. Show her from head to toe. Leave plenty of space around to see the cobblestones, stone arch, and two trees. The camera looks straight, at eye level of a standing person. Soft light of a cloudy day. No additional people or text.
This prompt does not specify millimeters at all. Nevertheless, it clearly describes a wide shot. If the image comes out as intended, try a second version: add at the beginning "look of a 24 mm lens, full-frame equivalent". Compare both. If there is almost no difference, nothing bad happened: the model already fulfilled the more important part of the instruction, which is to show the whole person and the surroundings.
How to improve the result without guessing
- Point out one visible problem. For example, "missing shoes", instead of "the image is not cinematic enough".
- Correct one sentence. Add "feet and shoes must remain fully in the frame; leave free space below them".
- Regenerate and compare. If you change the focal length, light, person, and movement all at once, you won’t know which change helped.
- Save the successful version. You will use it later as the first frame of the film or as a reference for subsequent frames.
4. Four ready shots of the same scene
Practice scene: an adult character in a brick-red coat stands in a courtyard with a stone arch. The light is soft and cloudy, horizontal format 16:9, each shot lasts five seconds. The prompts are in English because camera setting names often appear in English interfaces. You can translate them into Polish. Choose one block, do not paste all four at once into a single shot.
Each block has the same structure: first it says what is visible, then describes one action, and finally limits unwanted camera movement. The phrase "no zoom" means "no zooming in during the shot", and "no cut" means "no editing cut in the middle of this clip".
24 mm: show where we are
Use at the beginning of the scene when the viewer needs to read the space and the character's path. Control the edges: with a wide angle, important elements can easily become small.
Five-second 16:9 wide establishing shot, 24mm full-frame-equivalent lens look. An adult woman in a rust-red coat stands beneath a pale stone arch in a quiet courtyard. Show her full body from head to toe, with generous cobblestone foreground and the courtyard architecture clearly readable. Keep her away from the frame edges. She takes one relaxed step and glances across the courtyard. Fixed camera position at eye level, restrained handheld vibration only. No zoom, no forward camera travel, no cut.
70 mm: show the person, outfit, and gesture
This shot gives space for both the face and hands at the same time. If the gesture matters, write literally "both hands remain in the frame" – otherwise, the model may cut off the movement at the bottom edge.
Five-second 16:9 medium shot with a 70mm full-frame-equivalent lens look. Frame the same adult woman in a rust-red coat from about the waist up. Keep her entire head and both hands visible throughout. The stone arch and two potted trees remain recognizable but secondary. She adjusts one coat sleeve, then looks toward the camera. Camera stays at the same position and height during this shot, with only restrained natural handheld movement. No zoom, no push-in, no cut.
135 mm: show the thought on her face
A close-up works when the eyes, smile, or subtle change of expression matter. Give the character one short action. A large body movement may push the face out of the frame.
Five-second 16:9 close-up with a 135mm full-frame-equivalent lens look. Frame the woman from the shoulders up and keep her entire head in view. Her eyes and subtle facial expression are clear; the courtyard falls softly into the background. She turns slightly toward the camera, blinks naturally and gives a small knowing smile. The camera remains at a fixed distant position with gentle handheld movement. No zoom, no forward travel, no cut.
200 mm: tight portrait without approaching
Here, clearly distinguish the camera position from the size of the face. "Close to the face" can be interpreted as physically approaching with the camera; "camera on the other side of the courtyard, head and shoulders fill the frame" describes the intended result.
Five-second 16:9 tight portrait from a camera positioned across the courtyard, with a 200mm full-frame-equivalent telephoto lens look. The woman's whole head and upper shoulders fill most of the frame; do not crop the top of her hair or her chin. Her eyes stay sharp and the stone background is soft but believable. She pauses and looks across the courtyard, then briefly toward the lens. Camera remains in the same distant position. No zoom, no dolly movement, no cut.
Which frame to choose for your own scene?
- If the viewer needs to first recognize the place, start with a wide shot of 24 mm.
- If hands, clothing, or an object held by the person are important, choose a starting point of 70 mm and check the bottom edge.
- If the significance lies in the gaze or change of expression, choose a close-up of 135 mm.
- If the camera is to give the impression of observing from across the street or square, try 200 mm and describe a distant position.
You do not have to use exactly these four numbers in every project. They serve as convenient reference points. Whether the frame works depends on whether the viewer effortlessly understands what they should be looking at.
5. Make a fair comparison of focal lengths
There are two different exercises. Exercise A examines how the portion of the scene changes from one place. Exercise B examines how to achieve a similar size of the character from different places. Do not mix them in one series, as then it is unclear what caused the difference.
Exercise A: camera and character stay in place
- Establish one image format, camera height, direction of view, light, and character position.
- Prepare the first frame for 24 mm. Make versions with progressively narrower fields of view, preferably as matched frames of the same scene.
- At 70, 135, and 200 mm do not move the camera to maintain the same size of the character. The character should occupy an increasingly larger part of the image.
- Compare fixed background points and the size of the character. If the environment "jumps" to another place, the model changed something more than just the frame.
Create four matched still frames of the same courtyard and the same woman: 24mm, 70mm, 135mm and 200mm full-frame-equivalent lens looks. Keep the camera position, camera height, viewing direction, subject position, lighting, sensor format and aspect ratio unchanged. Change only the field of view so the composition becomes progressively tighter. Do not move the camera or the subject to keep her the same size. Preserve the location landmarks and identity in every frame.
The safest method to learn is to start with one wide image and prepare matched crops from it. Such a digital crop shows the change in the field of view from the same place but does not replicate differences in resolution, depth of field, or the character of real lenses. Separate AI generations can, however, change the face or architecture. Both methods have their limitations.
Exercise B: the same size of the character, different perspective
Now ask for a waist-up shot at 24 mm and 135 mm. To achieve a similar size of the character, the camera with 24 mm must be much closer, while the camera with 135 mm must be farther away. Compare the size of background elements relative to the face and the visible shape of the face. It is the change in camera position that changes the perspective.
Make two waist-up portraits of the same woman in the same courtyard, with the same aspect ratio and lighting. In version A use a 24mm full-frame-equivalent lens look and move the camera closer to keep her waist-up. In version B use a 135mm full-frame-equivalent lens look and move the camera farther away to keep her the same size. Do not change her pose or the courtyard. Show the difference in perspective and background scale caused by the different camera positions.
6. Transfer composition to video
The first frame is the still image from which the film begins. Some tools allow you to upload your own photo as such a frame and then ask the AI for movement. If you create a film from an image as the first frame, the composition is already partially established. The model should not receive a first frame with the whole silhouette and at the same time the instruction that frame 0.0 should be a tight portrait. Choose the frame before animation.
Simple process from image to five seconds of film
- Choose one of the four frames or generate a similar image of your character. Check if everything needed for the action is visible.
- Upload the image to the video tool as the starting image if the tool has such an option. Set the same aspect ratio, e.g., 16:9.
- Describe only the movement. For example, "the woman blinks and slightly turns her head". Do not request a new location or different clothing in the same attempt.
- Add boundaries: "the whole head remains in the frame for five seconds, the camera does not move in".
- Play the result from start to finish. Also stop it halfway. Check if the hands, hair, and background do not change randomly.
If the tool does not accept the starting image, combine the description of the scene's appearance with one of the video prompts from the previous section. In this mode, the model has more freedom and often changes details between attempts.
| Shot | Safe Movement | Typical Risk |
|---|---|---|
| 24 mm | One step, looking through the space | Character too small, unreadable expression |
| 70 mm | Small hand gesture and gaze | Hands cut off at the bottom edge |
| 135 mm | Blink, slight head turn | Hair or chin falling out of the frame |
| 200 mm | Pause and subtle reaction | Camera shake becomes visually too strong |
With a long focal length, limit camera movement. The same physical movement of the hand looks much stronger in a telephoto lens than in a wide shot. If you want a calm portrait, write "camera stays in place" or "minimal handheld movement".
7. Do not confuse focal length with camera movement
This is a common trap: you see the face getting larger on the screen and assume that the same thing has always happened. A similar effect can be achieved in three different ways, and each looks different.
- Start on a close-up: the first frame is already close. The viewer does not watch a zoom.
- Zoom: the focal length changes during the shot, the camera can remain in place.
- Dolly in: the camera physically moves toward the character, so the perspective also changes.
- Crop or digital zoom: changes the displayed portion of the existing image; details may lose quality.
An example with a phone: you can take three steps toward a person without changing the zoom – that’s a change in camera position. You can stand still and use zoom – that’s zoom or digital enlargement, depending on the phone. You can also record a close-up from the first second – then there is no zooming in the film. In prompts, these three decisions must be named separately.
If you want just a tight frame, use the phrase "start on a close-up" and exclude zoom. If you want to show the journey from a wide shot to the face, ask for a specific camera movement and specify its start and end. Do not enter "200 mm" as a substitute for the instruction "camera moves in".
8. Common mistakes and corrections
| Result | Why this happens | Correction in the prompt |
|---|---|---|
| "135 mm", but the whole person is visible | The model chose a larger distance | Add "from the shoulders up, the whole head visible". |
| "70 mm", but hands are cut off | The lower boundary was not specified | Add "both hands remain in the frame throughout the shot". |
| In a comparative series, the background changes | The model generated a new scene | Use a common first frame and fixed background points; check consistency before animation. |
| 200 mm portrait looks like the camera is close to the face | Lack of camera position | Write "camera on the other side of the courtyard, remains there". |
| The model zooms in the middle of the clip | "Close" was interpreted as movement | Write "tight frame from the first frame, no zoom and no dolly". |
| The background is too blurred | The model combined telephoto lens with shallow depth of field | Add "arch and trees remain recognizable". |
9. Ready bilingual mini-film
Apply the theory in a short story: shot 1 shows the heroine and the courtyard, shot 2 reveals the reaction. This is easier to control than trying to transition from 24 to 135 mm in one generated clip.
- Generate the first wide frame at 24 mm and animate it for 4 seconds. The heroine notices something off-camera.
- Generate the second first frame with a close-up at 135 mm. Keep the outfit, light, and background. Animate for 3 seconds: a glance, a short smile, without large movement.
- Combine both clips with a simple cut. Check if the direction of the gaze and the color of the light are consistent.
Shot 1: 4 seconds, 24mm full-frame-equivalent wide shot. Show the woman head to toe in the stone courtyard; she notices something off-camera and turns her head. Fixed camera, no zoom.
Shot 2: 3 seconds, 135mm full-frame-equivalent close-up from the shoulders up. Same woman, red coat, scarf, overcast light and courtyard. She looks in the same direction, then gives a subtle smile. Entire head stays visible. Fixed camera, no zoom.
Create these as two separate clips and join them with a simple cut. Keep wardrobe and identity consistent.
Export checklist
- Does the first frame have the intended size of the character and aspect ratio?
- Do the indicated body parts and important elements of the surroundings remain visible throughout the clip?
- Did the model not move the camera when it was only supposed to change the focal length?
- Does the sharpness of the eyes and the readability of the background match the intention?
- Do the character and architecture maintain consistency between shots?
- Can you publish the used images, likenesses, and reference materials?
Common questions from beginners
Do I need a real camera and four lenses?
No. The numbers in the prompts help convey to the model what kind of frame you expect. You can generate images and videos without a camera. However, if you want to compare the actual properties of lenses, you need a controlled photographic test, as AI can also change the face, background, and light.
Why do I enter 24 mm, but AI still cuts off the feet?
The model may not associate the number itself with the requirement "whole silhouette". Add image boundaries: "the character visible from the top of the head to the whole shoes; free space above the head and below the feet". If you are working with a starting image, correct that image before animation.
Does a longer focal length always give a blurred background?
No. In real photography, depth of field depends on several settings and distances. In AI generation, describe the result directly: "background recognizable" or "background softly blurred, eyes sharp".
Can I use the same prompts in a vertical film?
Yes, but change the format to 9:16 and check the frame boundaries. In vertical, it’s easy to fit the whole person, but less of the wide courtyard will be visible on the sides. In a medium shot, make sure both hands do not fall outside the bottom edge.
What to do if the character looks different in each frame?
Use the same character reference or successful starting frame for subsequent shots if the tool allows it. Describe constant features: coat, hairstyle, age, and light. Generate shots separately, then compare the face and clothing side by side before editing.
When should I just give up on the number of millimeters?
When the model regularly ignores it, and the verbal description works. "Whole person against the courtyard" or "face from the shoulders up" is more important than the number. Focal length helps refine the aesthetics but does not replace a clear description of what should be visible.
To start, choose two focal lengths: 24 mm to show the world, 135 mm to show the reaction. Only when these two frames work, add 70 mm for gesture and 200 mm for distant observation.
Comments (0)
No comments yet. Be the first!