
Not every AI production needs a large board with eight facial expressions and a dozen poses. For the first scene, a simple card often suffices: a large portrait, a front silhouette, and a back silhouette. In this guide, we will prepare such a card for a fictional botanist, a separate card for her notebook, and then use both in a scene. You will receive prompts and a way to check if the references truly helped.
The illustrations are original examples generated for the guide. The reference card does not automatically "freeze" the character, and the missing back view must be imagined by the model. Check each result before using it in a film.
Why divide the board into three readable parts?
Each panel has a different task. The portrait shows the geometry of the face, hair, and a small distinguishing mark. The front of the full silhouette establishes proportions, layers of clothing, and shoes. The back shows hair length, jacket cut, and elements visible when turned around. Equal panels make it easier for a person to compare, but there is no proof that the 16:9 layout is a universal key to the consistency of every model. Choose proportions that allow you to see the necessary details and fit the tool in which you will later use the image.
The example character, Lena, has a short dark chestnut bob, a small scar above her left eyebrow, a rusty orange field jacket, a dark turquoise shirt, graphite pants, and lace-up shoes. There is a small leather patch on the back of the jacket. These are six features that can be easily checked in subsequent generations.
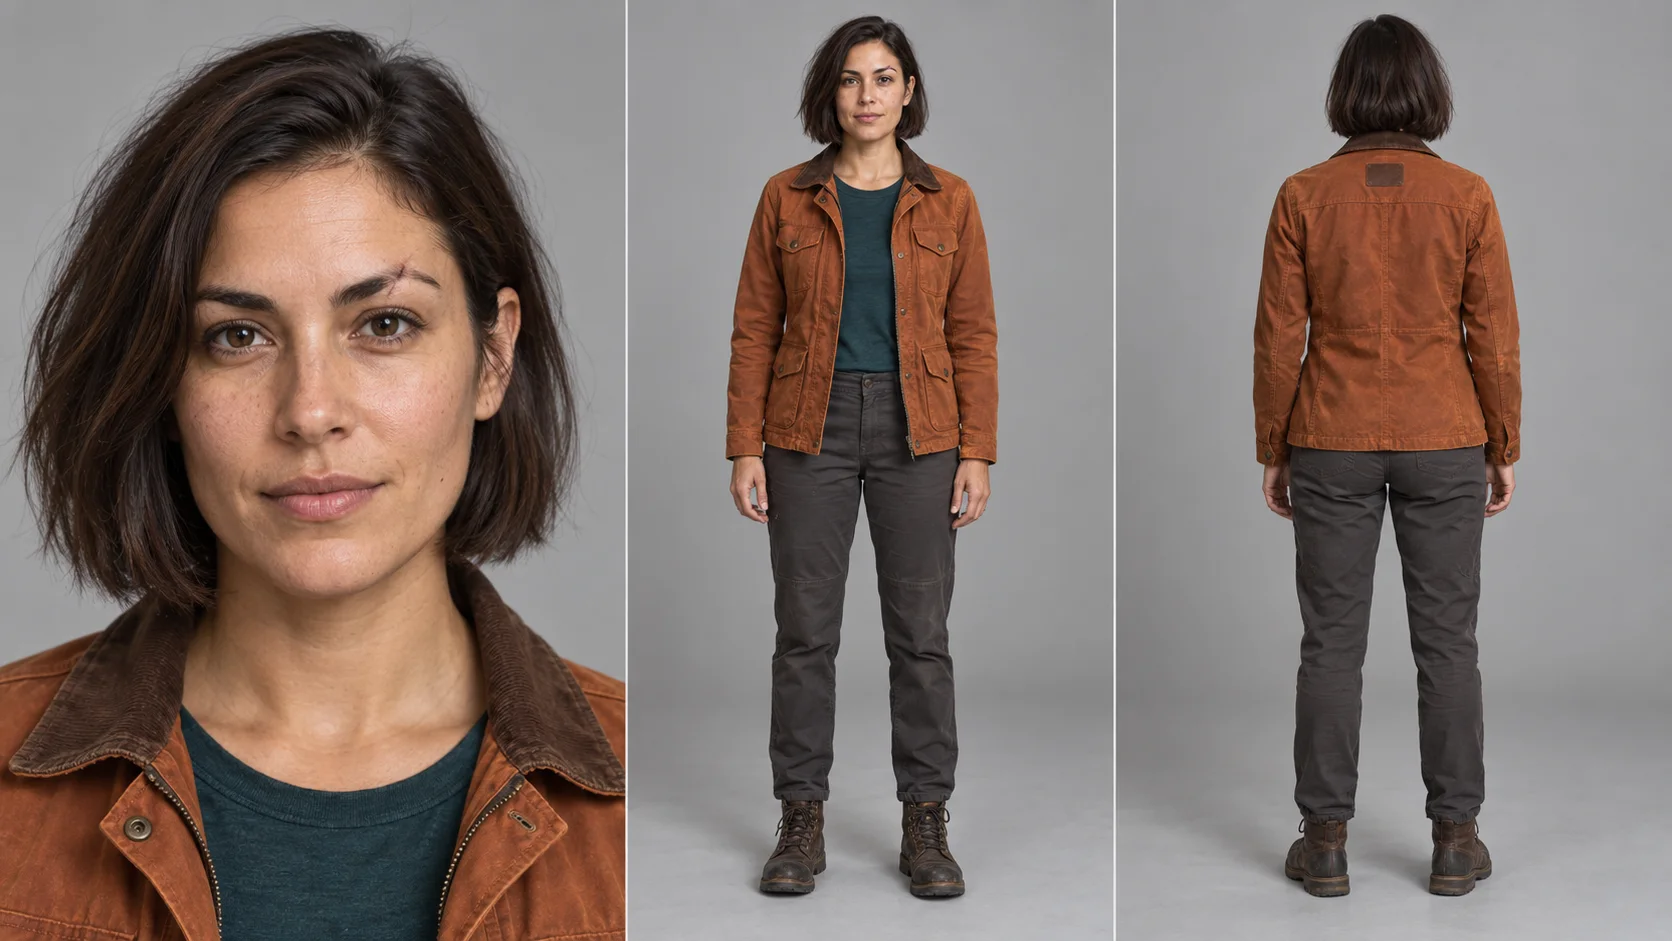
Do not copy three tiny versions of the same character into a square just because "that's how cards are made." If the face in the full silhouette shot has dozens of pixels, a later generator may get little useful information from it. Therefore, after approving the board, also save a separate cut of the large portrait and, when needed, a separate file with the silhouette. In the prompt, specify which image serves the face and which serves the clothing.
Prompt 1: Three-part character card
You can start with a description of a fictional character or include your own source image. In the latter case, add: "use the photo as the primary reference for the face and visible part of the outfit." One photograph from the front does not show the true back of the jacket or profile: the model will fill in those elements. For documentation of a specific costume, take real photos from the back.
Create a realistic, horizontal reference board 16:9 of one fictional adult character. Divide the image into three equal vertical panels with thin neutral gaps. Everywhere the same light gray matte studio background, evenly soft light, natural skin and material texture. No decorations, text, logos, or additional people.
Character: Lena, about 30 years old, field botanist; olive skin, brown eyes, small scar crossing the left eyebrow, dark chestnut hair to the chin tucked behind one ear. Rusty orange waxed cotton jacket, dark turquoise shirt, graphite straight pants, and dark brown lace-up shoes. On the back of the jacket, a small rectangular leather patch under the collar. Empty hands, no props.
Panel 1: large close-up of the head and shoulders from the front; face neutral and clearly visible. Panel 2: full figure from the front, calm posture, both hands at the sides, head and complete shoes in the frame. Panel 3: the same full figure from the back, exactly the same scale and posture as in panel 2, head and shoes in the frame. Maintain the same body structure, hairstyle, sleeve length, pocket arrangement, colors, and cut of the outfit. Do not create three different people, alternative clothing, or different hairstyles.
After generating, enlarge the image. Check the scar side, visibility of both shoes, and continuity of the jacket. In our example, the small scar is readable in the portrait, but in the distant silhouette, it remains small – this is why the large portrait has its own role.
Is a gray background really better than white?
Gray is a convenient working choice: it contrasts with bright clothing, does not compete with skin colors, and makes it easy to notice the outline of hair or shoes. However, it is not an automatic "exposure fixer." A white background does not by itself cause plastic skin or overexposure; those are determined by light, contrast, processing, and the model's interpretation of the prompt. A great card can also be made on a white background if the details remain visible.
Instead of the general "gray background = natural skin," specify concrete conditions: matte neutral background, soft diffused light, preserved details of skin and light fabrics, no smoothing. If you are comparing white and gray variants, keep the same character, model, settings, and description of light. Evaluate the result based on the details of the face and outfit, not just the color of the background.
Should the face be removed from the full silhouette panel?
Do not treat this as a mandatory step. The idea is for the model to see one large face instead of a large and small one, which may sometimes differ slightly. It may help in a specific tool, but we have no basis to claim that it always improves consistency. Covering the face also removes information about the shape of the head, neck, and hairstyle, and a gray spot may be copied into a later shot.
First, use the original, full card. If the face drifts, try in this order: (1) add a separate large portrait as an identity reference; (2) add a separate silhouette view as a clothing reference; (3) clearly outline the roles of the files in the prompt. Only then consider a test copy of the board with a uniform mask on the small face in the silhouette panel. Never mask the only source file. Compare A/B results with the same prompt and settings. If the mask appears in the generated scene, revert to the full version.
Prompt 2: Separate prop card
The character may look consistent, while the held item can change color, size, or number of buckles. Lena carries a field notebook. In the prop card, we show a close-up of the cover and the whole item at an angle to later check the size relative to the hand and the arrangement of the clasp.
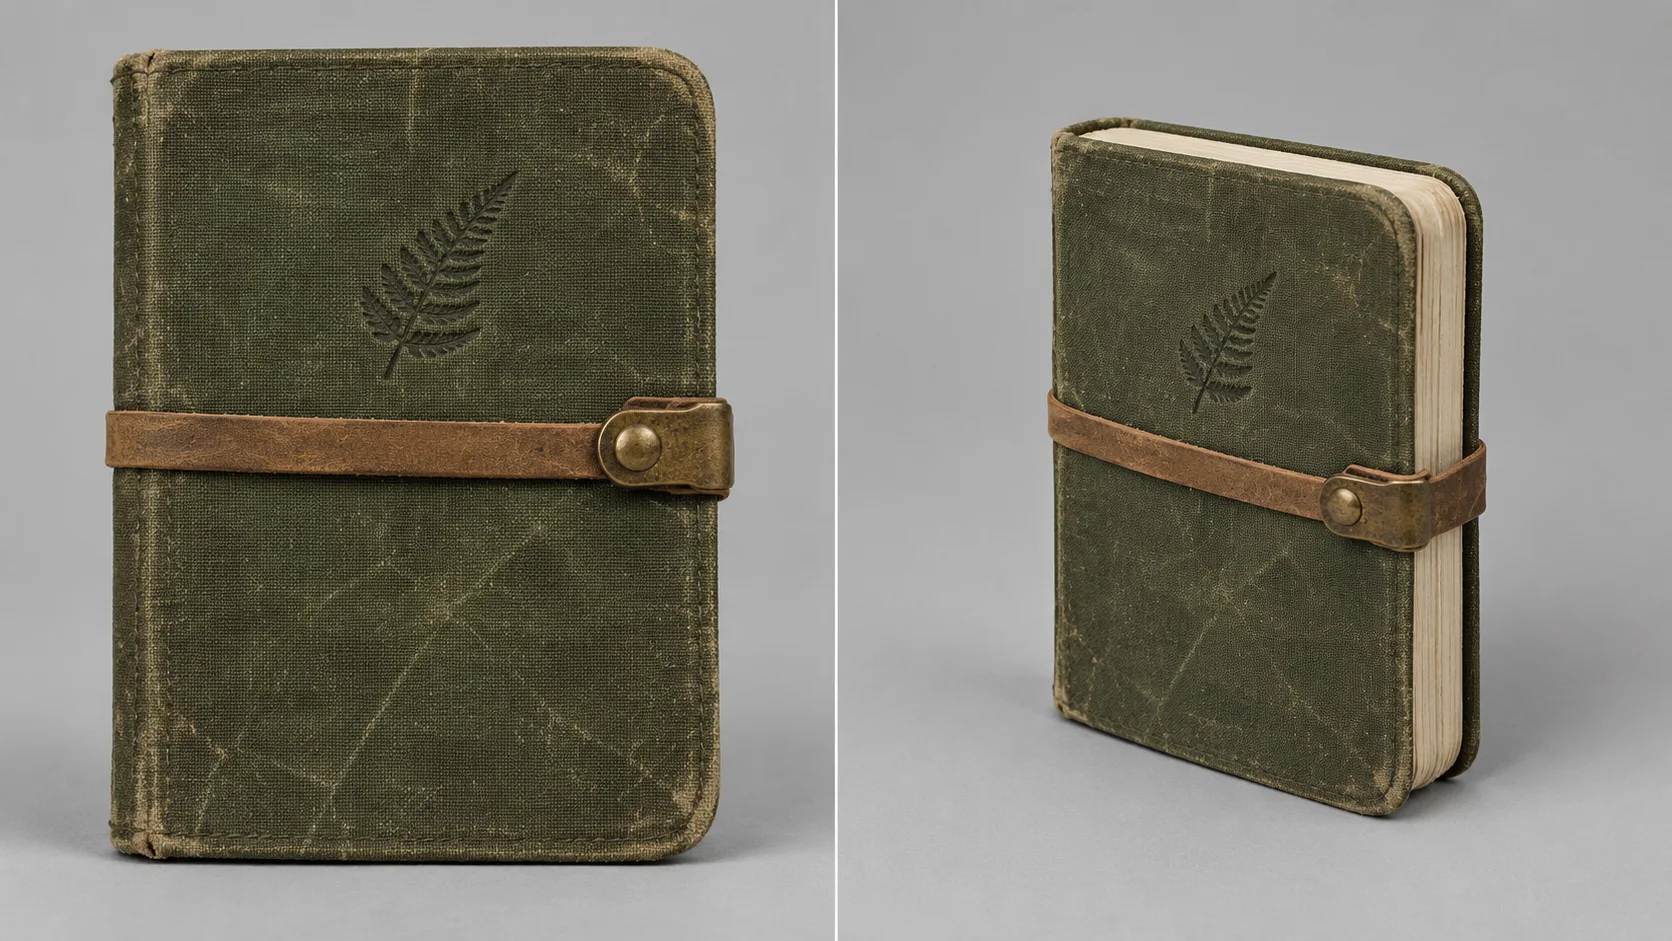
Horizontal realistic card of one prop, two equal panels, light gray matte background, the same soft lighting, and natural contact shadow. Item: a small vertical field notebook fitting in the hand, olive canvas cover with a wax texture, embossed fern symbol without letters, a narrow brown leather strap running horizontally through the middle, one matte brass buckle on the right edge, rounded corners, and cream edges of the pages.
Left panel: large close-up of the front cover, showing the canvas, embossing, strap, and buckle. Right panel: the same notebook at an angle of three-quarters, showing the thickness of the pages and complete edges. Maintain identical materials, proportions, buckle placement, and signs of use in both panels. No hands, other items, text, logos, or surroundings.
If you are creating a card for an existing product, include its real photos. One view does not reveal how the side or back looks – the model may guess them. In advertising and with items of precise geometry, check every generated detail against the real product.
Example: Combine character card and prop in a new scene
Now the roles are clear: @Image 1 corresponds to Lena, @Image 2 to the notebook. The new image should not copy the gray background of the boards, as the scene takes place in the forest. In our attempt, the face, jacket, and fern symbol remained recognizable, but the notebook changed proportions on the first try. We improved it with a separate edit. This is a normal control stage, not something to hide from the reader.
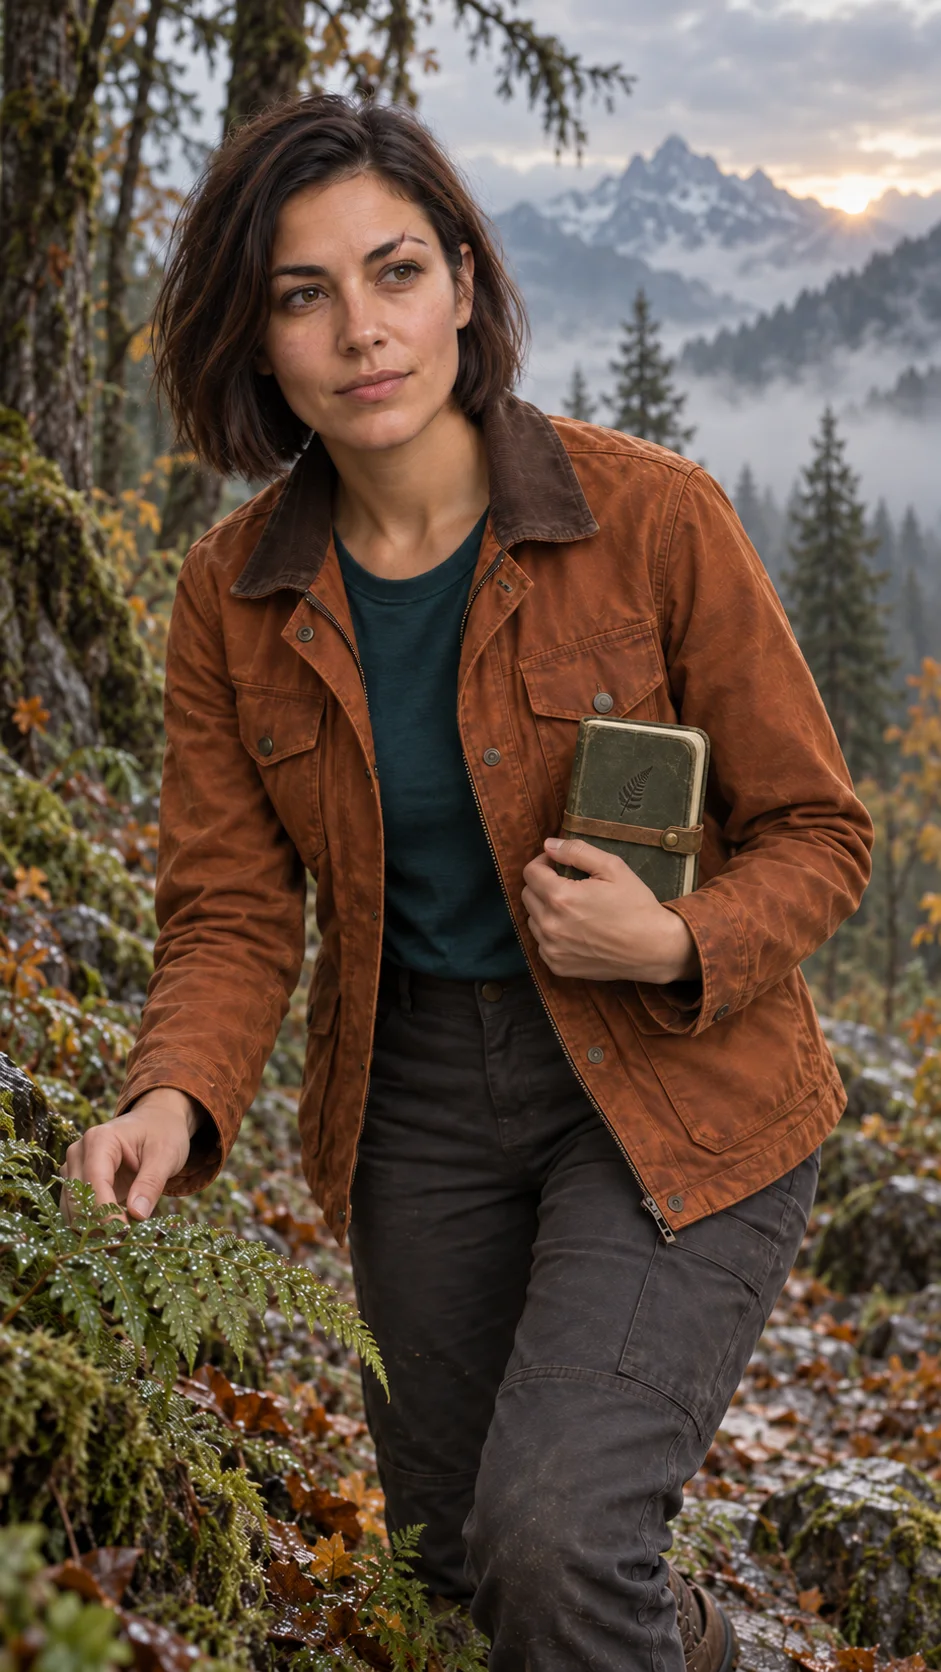
@Image 1 is Lena's character card: use the large portrait for the face and scar by the left eyebrow, the full silhouette view for the jacket, pants, and shoes. @Image 2 is the only notebook: maintain vertical proportions, olive canvas cover, embossed fern, horizontal leather strap, and brass buckle on the right side. Do not copy the studio background from any board.
New vertical frame 9:16: Lena stands on a wet path in a mountain forest at dawn. Medium shot to mid-thigh, soft cool light, and mist behind the trees. She holds exactly one small notebook in her left hand at chest level; with her right hand, she gently touches the fern. She looks towards the plant, then slightly beyond the lens. Natural skin and materials, realistic scale of the notebook in hand. No new people, text, logos, additional tools, or clothing changes.
If this frame is to be the first frame of a film, export it separately and include it in the video generator. In the video prompt, describe primarily the movement: the hand approaches the fern, the character raises her gaze, the notebook remains in the same hand. For 5–6 seconds, multiple scenes and cuts are not needed. Also, see an example of transitioning from a character to a short film with speech.
@Image 1 is exactly the first frame. One continuous shot, 6 seconds, vertical 9:16. Lena slowly touches the fern with her right hand, holding the same olive notebook still in her left hand. After two seconds, she raises her gaze towards the path. The camera remains at chest height with a very gentle movement from the hand. Maintain the face, scar, outfit, dimensions, and clasp of the notebook, morning light, and arrangement of the forest. No cuts, new props, hand changes, sudden zooms, or additional people. Only the sound of water droplets and wind in the leaves can be heard.
What to check before using the card?
| Question | Why it matters |
|---|---|
| Does the portrait and front silhouette show the same face? | A nice board may hide two slightly different faces. |
| Do the head, hands, and shoes fit in the whole? | A cut-off element will not help in a later shot. |
| Is the back of the outfit confirmed by source material? | If not, mark it as a draft, not faithful documentation. |
| Does the prop have the same size and clasp in both panels? | A small detail can easily change between shots. |
| Are the background and light equal, without smoothed skin? | The reference should reveal features, not cover them with effects. |
This minimalist layout is suitable for a quick test, a single shot, or creating the first "anchor" of appearance. If the character is to speak, show strong emotions, wear multiple outfits, or appear in multiple episodes, expand the set with a profile, facial expressions, and costume details. The entire process is described in our broader guide on character cards and other reference boards. Save approved versions of images and reuse them, rather than starting each time from a slightly different prompt.
Comments (0)
No comments yet. Be the first!